Are you ready to get the most out of your yoga ball but not sure how to inflate it properly? Inflating your yoga ball the right way is key to ensuring it feels just right—firm enough to support your body, yet with a little bounce for comfort.
If it’s underinflated, you might not get the stability you need. Overinflate it, and you risk damaging the ball or losing that perfect balance. In this guide, you’ll learn step-by-step how to easily and safely inflate your yoga ball, whether it’s your first time or just time for a quick top-up.
Keep reading to discover simple tips and tricks that will make inflating your yoga ball quick and hassle-free, so you can focus on your stretches and workouts without any interruptions.
Gather Needed Materials
Gathering the right materials makes inflating a yoga ball simple and quick. Having everything ready helps avoid interruptions and ensures the ball inflates correctly. Here are the key items you need before starting.
Yoga Ball
Choose a yoga ball that fits your height and exercise needs. Check the ball for any damage before inflating. Make sure the ball has a small air hole for inflation. The quality of the ball affects how well it holds air.
Air Pump Options
Select an air pump that matches the yoga ball’s valve type. Hand pumps, electric pumps, and foot pumps all work well. Electric pumps fill the ball faster and with less effort. Manual pumps are portable and easy to control.
Plug Remover Tool
Some yoga balls come with a plug remover tool. This tool helps take out the small plastic plug from the air hole. Using the tool prevents damage to the ball or valve. If you do not have the tool, a small, flat object may work carefully.
Prepare The Ball
Preparing your yoga ball is the first step before inflating it. This process ensures the ball inflates smoothly and safely. Proper preparation helps maintain the ball’s durability and performance.
Start by finding the exact spot where you will insert air. Then, carefully open that spot to begin the inflation.
Locate The Air Hole
Look for a small, round opening on the yoga ball. This is usually hidden under a small plug. The air hole is where you will insert the pump nozzle. It may be near the ball’s seam or on its surface. Make sure the area is clean and dry before proceeding.
Remove The Plug
Use your fingers or a plug remover tool to gently pull out the plug. Do this slowly to avoid tearing the ball’s surface. Keep the plug in a safe place to seal the ball after inflation. Check the hole for any debris or damage before pumping air.
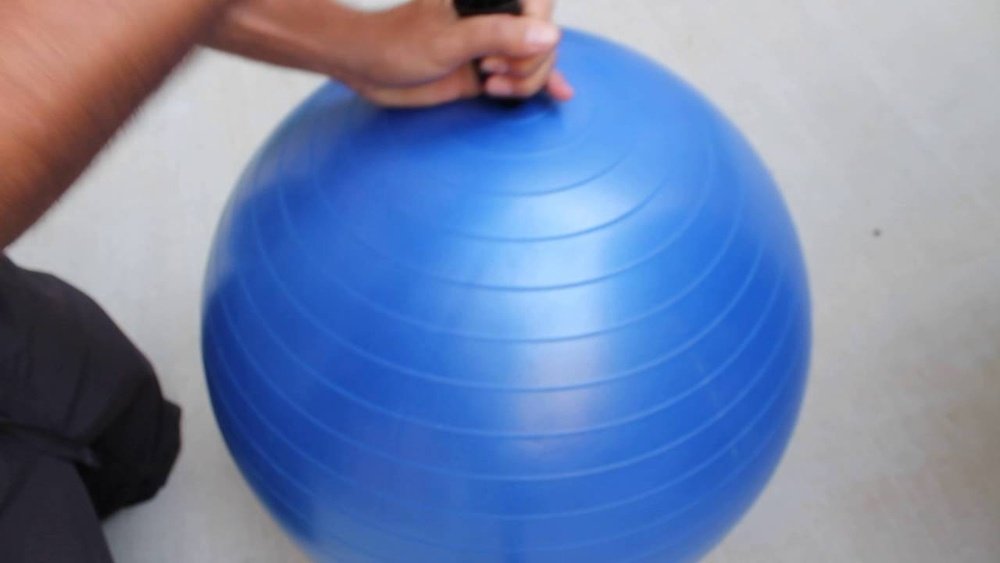
Attach The Pump
Attaching the pump is an essential step in inflating your yoga ball correctly. This process ensures air flows smoothly into the ball. It also helps prevent leaks and makes inflation faster.
Select The Correct Nozzle
Choose the nozzle that fits your yoga ball’s valve. Most pumps come with multiple nozzles. Match the nozzle size to the valve opening for a snug fit. Using the wrong nozzle can cause air to escape. A tight fit helps the pump work efficiently and fills the ball faster.
Create A Tight Seal
Push the nozzle firmly into the valve. Hold it steady to avoid air leaks. Check for any gaps between the nozzle and valve. You can use your fingers to press around the connection. A tight seal keeps air inside the ball during inflation. It also prevents the pump from losing pressure.
Inflate The Ball
Inflating a yoga ball is simple and quick. Proper inflation ensures the ball is firm and safe to use. This section guides you through the basic steps to inflate your ball correctly. Follow these tips for the best results.
Initial Inflation Tips
Start by finding the air valve on the yoga ball. Use a small tool or your fingernail to remove the plug carefully. Attach a hand pump or air compressor nozzle firmly to the valve. Pump air slowly to avoid damage. Inflate the ball to about 80% of its full size at first. Let the ball sit for a few hours to stretch. This step helps the ball material adjust before full inflation.
Check Ball Size
After the initial stretch, measure the ball’s diameter. Compare it with the size indicated on the packaging or instructions. The ball should match the recommended size for your height and use. Check the ball’s roundness as well. A properly inflated ball looks smooth and evenly shaped. Avoid under or over-inflating to keep the ball safe and functional.
Adjust Firmness
Add more air if the ball feels soft or squishy. Pump in small amounts and test the firmness often. The ball should feel firm but still have some give. If the ball feels too hard, release some air slowly. Press the valve gently to let air out. Adjust until you find the right balance for comfort and support. Secure the plug tightly after adjusting the air.
Seal The Ball
Sealing the yoga ball properly is key to keeping it firm and ready to use. After inflating, the ball needs a tight seal to prevent air from escaping. A loose seal causes the ball to deflate quickly. This section explains how to seal the ball effectively.
Remove Pump Quickly
Once the ball reaches the desired firmness, pull out the pump nozzle fast. Leaving the pump in place allows air to leak out. A quick removal stops air loss immediately. Be careful not to let the nozzle stay in the hole too long.
Insert The Plug Securely
After removing the pump, insert the plug into the air hole right away. Press it firmly to ensure it fits tight. The plug must sit flush with the ball’s surface. If the plug is loose, air will escape and the ball will lose pressure.

Credit: sportcafehuelva.com
Let The Ball Settle
After inflating your yoga ball, it is important to let it settle. This step helps the ball adjust and stretch properly. Skipping this can lead to uneven shape or pressure points. A well-settled ball feels more comfortable and lasts longer. Let the ball rest at room temperature to allow the material to relax and expand fully.
Allow Stretching Time
Once inflated, let the yoga ball sit for a few hours. This gives the material time to stretch and soften. The ball will become more flexible and reach its full size naturally. Avoid using or over-inflating the ball during this period. Stretching time ensures the ball holds air better and feels firmer when ready.
Reinflate If Needed
After the ball has settled, check its firmness. It may lose some air during the stretching phase. Add more air if the ball feels soft or underinflated. Do this slowly to avoid overinflating. Reinflate the ball until it feels firm but comfortable. This step keeps the ball stable for exercises and daily use.
Inflate Without A Pump
Inflating a yoga ball without a pump is possible with simple methods. This approach works well if you don’t have a pump handy. It saves time and effort using tools already at home. Learn safe and effective ways to inflate your yoga ball using your breath or other alternatives. Follow these tips to get your ball ready for exercise or relaxation quickly.
Using Lung Power Safely
Blowing up a yoga ball by mouth needs care. The ball’s air valve is small, so take breaks often. Deep breaths fill the ball faster but avoid dizziness. Sit down and breathe slowly to keep control. Keep the ball steady and close to your mouth. Seal your lips tightly around the valve. Blow air with short, strong puffs to avoid tiring out. Stop if you feel lightheaded or tired. Using a straw can help direct air better inside the valve. After inflating, quickly close the valve to keep air inside. This method works best for small to medium balls.
Alternative Methods
Other ways to inflate a yoga ball use common household items. A vacuum cleaner with a blowing function can push air inside. Use a balloon pump if available. A hairdryer on cool air mode can also work by forcing air into the valve. Another option is using a plastic bottle. Cut the bottom off and fit the neck into the valve. Blow into the bottle to move air into the ball. Avoid sharp objects near the ball to prevent damage. These methods help when no pump is available and can be quicker than blowing by mouth alone.
Use A Bicycle Pump
Using a bicycle pump to inflate your yoga ball is simple and effective. It saves time and effort compared to blowing it up by mouth. Most bicycle pumps come with a needle attachment perfect for yoga ball valves. This method works well for both new and partially inflated balls.
Prepare The Pump
Start by checking your bicycle pump. Make sure it has a needle adapter for inflating balls. If not, buy one from a sports store or online. Clean the needle with a cloth to avoid dirt entering the ball. Attach the needle securely to the pump’s hose.
Attach To Ball
Locate the air valve on the yoga ball. Remove the plug carefully and keep it safe. Insert the pump’s needle into the valve gently. Push it in straight to avoid damage. Hold the ball steady to keep the needle in place during inflation.
Inflate Efficiently
Start pumping air slowly into the ball. Check the ball’s firmness often by pressing it with your hand. Stop inflating when the ball feels firm but still slightly soft. Avoid overinflating, which can cause damage. Remove the needle carefully and quickly replace the plug to keep air inside.
Maintain Ball Pressure
Maintaining the right pressure in your yoga ball keeps it safe and comfortable. A properly inflated ball supports your body well during exercises. Over time, air may slowly escape, so check the pressure regularly. Proper care extends the ball’s life and improves your workout quality.
Regular Reinflation
Check the ball’s firmness before each use. Press the surface with your hand. It should feel firm but have slight give. If the ball feels soft, add air using a pump. Inflate in small bursts and test often. Avoid overinflating as it can cause damage. Keep the ball at the recommended size and pressure.
Check For Leaks
Leaks cause loss of air and reduce ball pressure. Inspect the ball carefully for holes or tears. Listen for hissing sounds that show escaping air. You can also apply soapy water and watch for bubbles. If you find a leak, patch it with a repair kit. Regular inspection prevents sudden deflation during use.

Credit: www.janereactionfitness.com
Deflate The Ball
Deflating your yoga ball is as important as inflating it. Proper deflation helps keep the ball in good shape. It also makes storage easier and saves space. Follow these simple steps to deflate your yoga ball safely and efficiently.
Remove Plug
Locate the ball’s air hole. It is usually covered by a small plug. Use your fingers or a plug remover tool to gently pull out the plug. Avoid using sharp objects that can damage the ball.
Release Air Slowly
Press the ball gently to push air out. Do this slowly to avoid sudden bursts. Let the air escape naturally for better control. Keep pressing until the ball feels flat and soft.
Fold And Store
Once deflated, fold the ball carefully. Avoid sharp creases to prevent damage. Store it in a cool, dry place away from direct sunlight. Proper storage extends the ball’s lifespan and keeps it ready for next use.

Credit: www.greenwaysllc.com
Frequently Asked Questions
How Do You Inflate A Yoga Ball?
Remove the plug from the yoga ball’s air hole. Insert a pump nozzle tightly. Inflate until firm with slight give. Quickly replace the plug to seal air inside. Let the ball rest for a few hours before use.
How To Air Up A Yoga Ball Without A Pump?
To air up a yoga ball without a pump, use your mouth or a vacuum cleaner with a blowing function. Ensure a tight seal around the valve. Inflate slowly and check firmness. Replace the plug quickly to prevent air loss.
Can I Use A Bicycle Pump To Inflate A Yoga Ball?
Yes, you can use a bicycle pump to inflate a yoga ball. Use the correct nozzle adapter for a proper seal. Inflate slowly to avoid damage.
How Do You Inflate Your Ball?
Remove the plug from the ball’s air hole. Insert a pump nozzle securely. Inflate until firm with slight give. Quickly replace the plug to prevent air loss.
Conclusion
Inflating a yoga ball is simple with the right steps. Start by removing the plug carefully. Attach your pump tightly to avoid air leaks. Inflate the ball until it feels firm but still soft. Let it rest for a few hours to stretch fully.
Regularly check the firmness before each use. Proper inflation ensures safety and comfort during workouts. Follow these tips to enjoy your yoga ball every day.