Yoga Needle Pose is a unique posture that challenges both flexibility and balance. Also called Thread the Needle Pose, it is loved by yogis for its deep shoulder stretch and calming effect. If you’re looking to improve your yoga practice, this pose is a gentle but powerful addition. Many people, even those new to yoga, can benefit from learning how to do Needle Pose the right way.
In this article, you’ll discover everything you need about Yoga Needle Pose: what it is, how to practice it safely, its physical and mental benefits, variations for different levels, common mistakes, and expert tips. Whether you’re a beginner or an experienced student, you’ll find useful insights for your journey.
What Is Yoga Needle Pose?
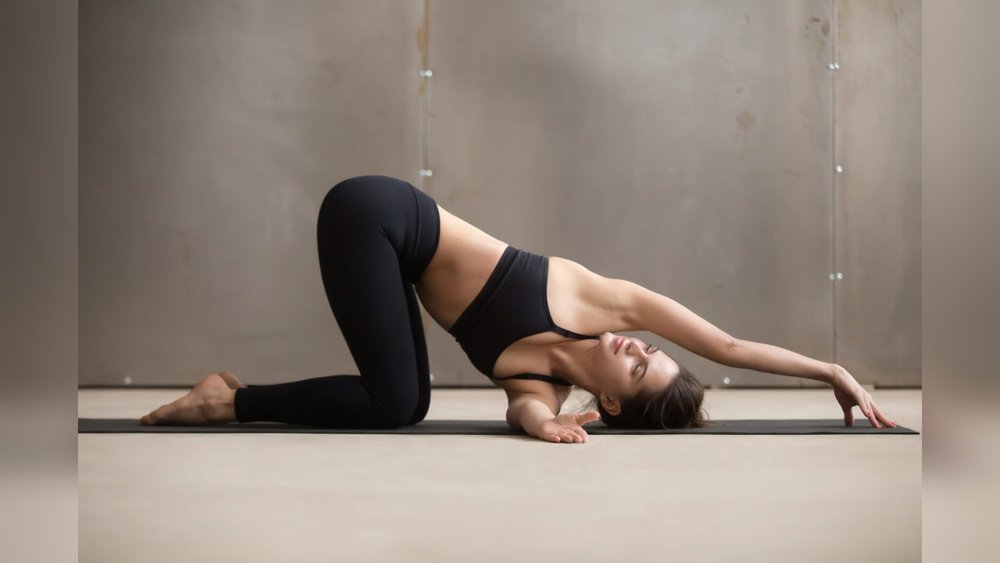
Yoga Needle Pose is a floor-based yoga posture. In Sanskrit, it’s called Parsva Balasana, which means “Side Balancing Pose.” The most common English name is Thread the Needle Pose. The pose looks like you’re threading one arm under the other, as if passing a thread through the eye of a needle.
This pose is practiced on hands and knees. One arm threads underneath the body, and the shoulder and side of the head rest on the mat. The other arm supports you or reaches forward for a deeper stretch.
It’s a gentle twist, not a backbend or forward fold. It’s suitable for most people, and it’s often used in warm-ups, cool-downs, or restorative yoga sequences.
Key Benefits Of Yoga Needle Pose
Yoga Needle Pose offers a surprising number of benefits for such a simple-looking posture. Here are the main advantages:
- Shoulder Flexibility: It deeply stretches the shoulders, especially the muscles at the back and side.
- Upper Back Relief: The twist opens the upper back, reducing tension from long hours at a desk.
- Neck Release: It gently relaxes the side of your neck, easing stiffness.
- Spine Mobility: The twist increases rotation in the upper spine (thoracic region).
- Calming Effect: The position feels restful. It encourages slower breathing and relaxation.
- Improved Posture: Regular practice helps counteract rounded shoulders and a stiff back.
- Preparation for Deeper Poses: It warms up the body for more advanced twists and arm balances.
Many yoga teachers recommend Needle Pose for people with tight shoulders, upper back tension, or mild neck discomfort. However, it’s important to practice safely if you have any injuries.
Step-by-step Guide: How To Practice Yoga Needle Pose
Doing Needle Pose the right way is important for safety and effectiveness. Follow these steps:
- Start on All Fours: Come to a tabletop position—hands under shoulders, knees under hips.
- Check Alignment: Keep your back flat, fingers spread wide, and neck in line with the spine.
- Inhale and Prepare: Take a deep breath in.
- Exhale, Thread the Arm: Slide your right arm under your left arm, palm facing up. Let your right shoulder and right ear rest gently on the mat.
- Adjust Hips: Keep your hips lifted and square (don’t twist the pelvis). Knees stay in place.
- Left Hand Placement:
- Option 1: Keep your left hand where it is (for support).
- Option 2: Walk your left hand forward, stretching it in front of you for a deeper twist.
- Relax and Breathe: Stay here for 5–10 slow breaths. Feel the stretch along your right shoulder, back, and neck.
- To Come Out: Press into your left hand, slide your right arm back out, and return to tabletop.
- Repeat on Other Side: Practice with the left arm threading under.
Practical Tips For Beginners
- Use a folded blanket under your head or shoulder for extra padding.
- Move slowly—never force the stretch.
- Keep your face relaxed and jaw unclenched.
- If you feel tingling or numbness, back off and adjust.
- Focus on steady breathing; this helps the muscles release.
When To Practice Yoga Needle Pose
You can do Needle Pose at several points in your yoga practice or day:
- Warm-Up: Before more intense shoulder or back work.
- Cool-Down: After exercise, to release tension.
- Restorative Sessions: As a relaxing pose for stress relief.
- Desk Breaks: After long periods of sitting.
Doing the pose regularly (even 2–3 times a week) can bring noticeable improvements in shoulder and upper back comfort.
Common Mistakes And How To Avoid Them
Even though Needle Pose looks simple, there are common errors. These can reduce the benefits or even cause strain.
- Twisting the Hips: Your hips should stay level and in line with your knees. Don’t lean to one side.
- Jamming the Shoulder: Don’t force your shoulder down hard. Let gravity do the work slowly.
- Collapsing the Neck: The side of your head gently rests on the mat. Avoid putting all your weight on your head.
- Shrugging the Supporting Shoulder: Keep the supporting (top) shoulder away from the ear.
- Holding the Breath: Steady, relaxed breathing is essential.
Focus on alignment and comfort, not on how far you can twist. If you’re working with a teacher, ask for feedback on your form.
Variations For All Levels
Needle Pose can be adapted for different bodies and skill levels. Here’s how you can make the pose easier or more challenging:
For Beginners
- Place a thick blanket under your head and shoulder.
- Keep the supporting hand close for more stability.
- Hold the pose for only a few breaths at first.
For Intermediate Students
- Reach the supporting arm forward, palm down, to intensify the stretch.
- Try holding the pose for 8–10 breaths.
- Engage your core to keep the hips steady.
For Advanced Practice
- Lift the top arm up toward the ceiling and twist the chest open.
- Bind the top arm behind your back, resting your hand on the lower back or thigh.
- Flow between Needle Pose and other twists for dynamic movement.
For People With Special Needs
- If you have knee sensitivity, place a folded mat or towel under your knees.
- For tight wrists, make fists with your hands instead of pressing the palms flat.
Comparison: Needle Pose Vs. Other Shoulder Stretches
How does Needle Pose compare to other popular yoga stretches for the shoulders? This table highlights the key differences:
| Pose Name | Primary Focus | Difficulty | Best For |
|---|---|---|---|
| Needle Pose | Shoulders, upper back, neck | Easy–Moderate | All levels, stress relief |
| Cow Face Arms | Shoulder rotation, triceps | Moderate | Shoulder mobility |
| Puppy Pose | Chest, shoulders, spine | Easy | Front shoulder opening |
| Thread the Needle (Supine) | Outer hips, back | Easy | Hip flexibility |
Needle Pose stands out for its gentle twist and all-levels accessibility.
The Science Behind Needle Pose
While Needle Pose feels great, what does science say about its effects? Studies on yoga and stretching show several benefits:
- Improved Flexibility: Regular stretching increases range of motion in the shoulders and upper back (source: American Council on Exercise).
- Reduced Muscle Tension: Gentle twists help relax the muscles around the spine and shoulders.
- Lower Stress Levels: Yoga postures that encourage slow breathing reduce cortisol, the stress hormone.
- Better Posture: Poses that open the upper back and shoulders can help reverse the effects of slouching.
A 2020 study in the *International Journal of Yoga* found that gentle twisting poses like Needle Pose can improve spinal mobility and reduce upper back discomfort after only four weeks of practice.
Who Should Avoid Needle Pose?
While most people can practice this pose, some should avoid it or modify:
- If you have a shoulder injury or recent surgery, skip this pose or use lots of props.
- People with severe neck pain should consult a doctor or physical therapist.
- If you have knee problems, use extra padding or skip if it causes discomfort.
- Pregnant people in the later stages should ask their healthcare provider first.
When in doubt, go slowly and listen to your body.
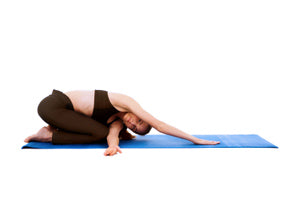
Real-life Example: Needle Pose For Desk Workers
Many office workers develop rounded shoulders and tight upper backs. Needle Pose is especially helpful for them. For example, Maria, a graphic designer, found that practicing Needle Pose for five minutes after work reduced her shoulder tension and headaches within a month.
She used a pillow under her shoulder and did the pose three times per week. This small habit made a big difference in her comfort at her desk.

Credit: www.tummee.com
How To Add Needle Pose To Your Yoga Routine
You don’t need a long yoga session to benefit from this pose. Here are three ways to use it:
- Standalone Stretch: Do 1–2 minutes per side as a morning or evening stretch.
- Part of a Flow: Add Needle Pose after Cat-Cow or Child’s Pose in your yoga sequence.
- Restorative Yoga: Hold the pose longer (up to 2 minutes) with props and gentle breathing for relaxation.
Try combining Needle Pose with other gentle twists and shoulder stretches for a balanced upper body routine.
Props And Modifications
Many people find that props make the pose more comfortable. Here’s a quick look at what you can use:
| Prop | How It Helps | Who Should Use |
|---|---|---|
| Blanket | Cushions head and shoulder | Beginners, sensitive joints |
| Yoga block | Raises ground for shoulder or head | Limited flexibility |
| Bolster | Deep relaxation, restorative style | People seeking stress relief |
Experiment with different props to find what works best for your body.

Credit: www.yogabasics.com
Yoga Needle Pose For Athletes
Athletes often develop tight upper backs and shoulders. Needle Pose is popular with swimmers, tennis players, and weightlifters. It helps balance out strong chest muscles and prevents overuse injuries.
For example, swimmers often add Needle Pose into their cool-down routine after training. It helps release tension built up from repetitive arm movements, improving recovery and flexibility for the next session.
Mindfulness And Breath In Needle Pose
The pose is not just physical. It’s also a chance to practice mindfulness and conscious breathing. As you hold Needle Pose:
- Bring attention to the sensation in your shoulder and back.
- Notice your breath slowing down.
- Use each exhale to relax deeper into the pose.
This mindful approach can turn a simple stretch into a calming ritual. Over time, you may notice less stress and more ease in your body and mind.
How To Progress Safely
If you want to get more from Needle Pose, increase the challenge slowly:
- Hold the pose for a few more breaths each week.
- Try the advanced variations only after you’re comfortable with basic alignment.
- Alternate sides to balance your flexibility.
- Pair Needle Pose with chest openers (like Puppy Pose or Cobra) for best results.
Avoid pushing through pain—progress in yoga is about patience and consistency.
Final Thoughts
Yoga Needle Pose is a quiet hero in the world of yoga. It may look simple, but it offers deep rewards for your shoulders, spine, and mind. With regular practice, you’ll find more freedom in your upper body and less daily tension.
Remember, comfort and alignment matter more than how far you can twist.
If you’re curious to learn more about yoga poses and their benefits, you can explore detailed resources at the Yoga Journal.
Credit: www.everydayyoga.com
Frequently Asked Questions
What Is The Main Purpose Of Yoga Needle Pose?
The main purpose is to stretch the shoulders, upper back, and neck while gently twisting the spine. It also promotes relaxation and improves posture.
Is Yoga Needle Pose Safe For Beginners?
Yes, it’s generally safe for most beginners. Start slowly, use props, and don’t force the stretch. If you have injuries, consult a yoga teacher or healthcare professional first.
How Long Should I Hold Needle Pose?
Hold for 5 to 10 slow breaths per side. Advanced practitioners can hold up to 2 minutes for a deeper stretch, but comfort is key.
Can Yoga Needle Pose Help With Back Pain?
It can help with upper back tension and mild discomfort, especially from sitting or working at a desk. However, those with serious back or spine issues should check with a doctor before trying it.
What Are Good Poses To Pair With Needle Pose?
Great poses to pair include Cat-Cow, Child’s Pose, Puppy Pose, and gentle seated twists. These combinations provide a balanced stretch for the whole upper body.