Yoga can do amazing things for your flexibility, but some poses—like the splits—can feel impossible at first. If you’ve ever tried to slide into a split and felt stuck halfway, you’re not alone. This is where yoga blocks come in. These simple props can help bridge the gap, making the splits more accessible, safer, and actually enjoyable, no matter your current flexibility. Let’s dive into how yoga blocks can transform your journey toward full splits, the best ways to use them, and the common mistakes to avoid for faster, safer progress.
Why The Splits Are Challenging
The splits (also called Hanumanasana in yoga) ask a lot from your body. You need flexible hamstrings, open hip flexors, and good alignment. Most people feel tightness in the back of the front leg and the front of the back leg. If you push too hard, you risk injury—especially to your hamstrings or groin. This is why props like yoga blocks are so valuable. They allow you to work safely at your current level without forcing your body too far, too fast.
What Are Yoga Blocks And Why Use Them For Splits?
Yoga blocks are sturdy foam or cork blocks, usually about 9 x 6 x 4 inches. You can use them at different heights (flat, on the side, or standing tall) to support different poses. For splits, blocks can:
- Support your weight so you don’t strain muscles
- Raise the floor to meet your current flexibility
- Help you hold proper form longer
- Reduce pressure on your hips and knees
- Make the experience less scary (fear of falling can block progress)
Many advanced yogis still use blocks for deep stretches. Even if you’re close to the floor, blocks help you refine alignment and stay safe.
How Yoga Blocks Help You Progress Toward Splits
Let’s look at the step-by-step role of blocks in split training:
- Initial Support: When you’re far from the floor, blocks under your hands or under your hips take the weight off your legs. This helps you relax into the stretch, which is key for flexibility gains.
- Gradual Lowering: As you get more flexible, you can use lower block heights or remove one block at a time. This lets you progress at your own pace.
- Alignment: Blocks keep your hips and spine in the right position. Without blocks, people often twist or drop their hips, which can cause injuries.
- Longer Holds: With support, you can stay in the stretch longer, which helps your muscles adapt faster.
Using Yoga Blocks For Splits: Step-by-step Guide
Ready to try splits with yoga blocks? Here’s a practical sequence that works for most people.
1. Warm Up Properly
Never jump straight into splits. Start with 5-10 minutes of light cardio (like jogging in place or jumping jacks) to get your blood flowing. Next, do dynamic stretches for your hips and hamstrings. Lunges, leg swings, and seated forward folds are all good choices.
2. Place The Blocks
You’ll need two yoga blocks. Set them at the highest height, one on each side of your hips. Start in a low lunge, with your front knee over your ankle and your back knee on the mat.
3. Begin To Lower Into The Split
Slowly slide your front foot forward and your back knee backward. As you go down, place your hands on the blocks for support. Stop when you feel a strong stretch, but no sharp pain. Your hips should face forward, not tilt to the side.
4. Adjust The Block Height
If you can go lower, turn the blocks to a medium or low height. If you’re very tight, keep the blocks tall and even add a third block under your front thigh or back thigh for extra support.
5. Hold And Breathe
Stay here for 30 seconds to 2 minutes. Focus on relaxing your muscles and taking slow, deep breaths. Never force your body further than it’s ready to go.
6. Repeat On The Other Side
Always stretch both sides equally. You’ll probably notice one side is tighter. That’s normal, but don’t skip your weak side—it often needs more attention.
7. Cool Down
After split practice, do gentle stretches like child’s pose or reclined twist to relax your hips and lower back.
Different Ways To Use Yoga Blocks For Splits
Yoga blocks aren’t just for under your hands. Here are other creative ways to use them:
- Under your front thigh: If your hamstrings are tight, put a block under your front thigh to support the weight.
- Under your back thigh: Good for people with tight hip flexors or quads.
- Between your thighs: Squeeze a block gently to keep your hips square.
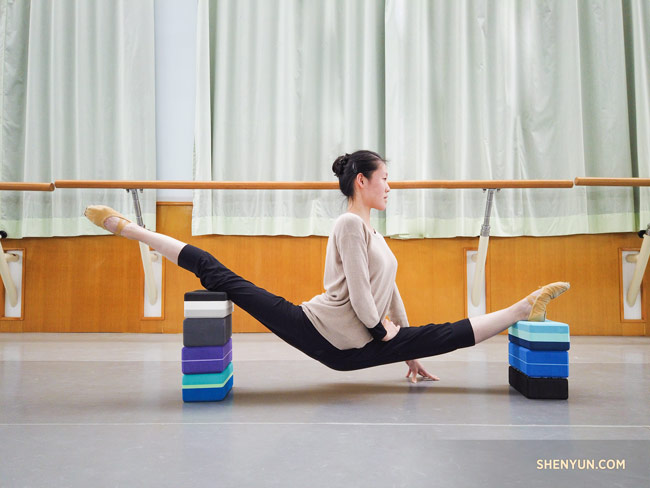
- For active flexibility: Place blocks under both hands and gently lift your legs a few inches off the floor (good for building strength and control).
Here’s a quick comparison of common block placements for splits:
| Block Placement | Main Benefit | Best For |
|---|---|---|
| Under hands | Stability and support | All levels |
| Under front thigh | Reduces hamstring strain | Beginners, tight hamstrings |
| Under back thigh | Reduces hip flexor strain | People with tight quads |
| Between thighs | Helps square hips | Improving alignment |
Choosing The Right Yoga Blocks For Splits
Not all blocks are created equal. For splits, you want blocks that are:
- Firm and stable (avoid soft blocks that squish)
- Tall enough (at least 4 inches thick)
- Non-slip surface (for safety)
- Durable (especially if you’re heavier or practice often)
Foam blocks are lighter and softer, while cork blocks are heavier and more stable. Some people like to use two different types for different placements.
Here’s a quick comparison:
| Block Type | Weight | Stability | Comfort | Durability |
|---|---|---|---|---|
| Foam | Light | Moderate | Softest | Good |
| Cork | Heavy | Very high | Firm | Excellent |
| Wood | Heavy | Excellent | Hard | Very high |
For most beginners, foam is fine. But if you want maximum stability, consider cork or wood.
Tips For Faster Progress With Yoga Blocks
Many people plateau with splits because they repeat the same routine without tweaks. Here are some lesser-known tips that can help:
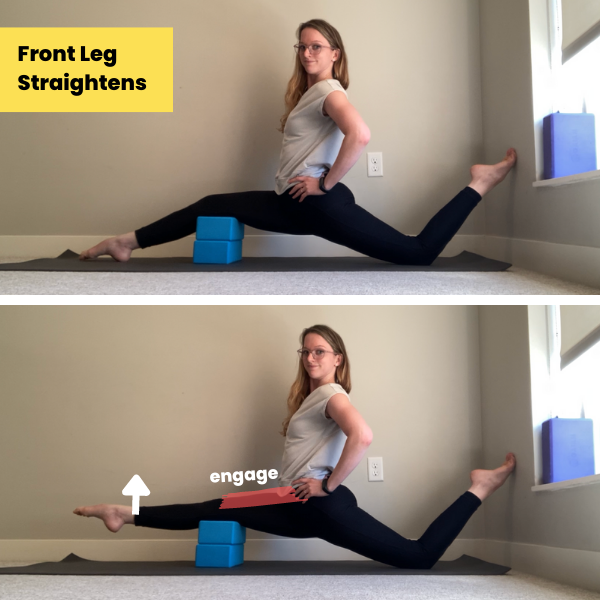
- Engage your muscles: Don’t just collapse into the stretch. Actively press your legs down and squeeze your glutes gently. This helps build strength and protects your joints.
- Use heat: Practicing splits after a warm shower or in a heated room can make your muscles more pliable.
- Mix static and dynamic stretching: Try moving gently in and out of the split position before holding it. This signals to your nervous system that the movement is safe.
- Vary your block heights: As you warm up, start with higher blocks and gradually lower them. This progressive overload encourages flexibility gains.
- Track your progress: Take photos or notes every few weeks. Sometimes progress is slow and easy to miss unless you measure it.
A hidden insight: Many people only stretch their hamstrings, but tight hip flexors on the back leg are often the real roadblock for splits. Add lunges, quad stretches, and hip openers to your routine.
Common Mistakes To Avoid When Using Yoga Blocks For Splits
Even with blocks, it’s easy to make mistakes that stall your progress or cause pain. Watch out for these:
- Twisting your hips: Your hips should face forward, not open to the side. Use a mirror or record yourself to check.
- Letting your back arch: Keep your core engaged and spine long.
- Forcing too quickly: If you feel sharp pain, back off immediately. Progress takes time.
- Using slippery blocks: Cheap blocks can slide on some floors. Always test your setup before going deep.
- Ignoring warm-up and cool-down: Cold muscles are less flexible and more likely to tear.
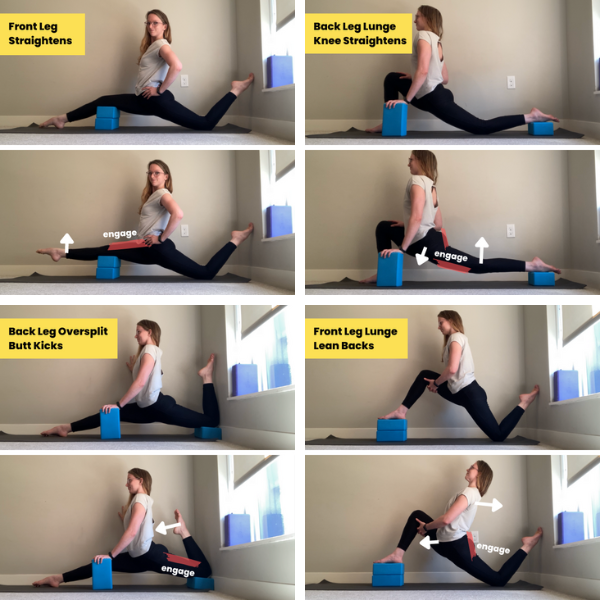
Credit: www.daniwinksflexibility.com
How Often Should You Use Yoga Blocks For Splits?
Consistency is key. Most people see the best results by practicing split stretches 3-5 times per week. Each session should last at least 10-15 minutes, including warm-up and cool-down. Don’t stretch to your max every day—your muscles need time to recover and adapt.
Supplementary Exercises To Improve Your Splits
Yoga blocks alone won’t get you all the way to the splits. For faster progress, combine block-supported splits with:
- Active hamstring stretches: Like lying leg lifts or standing kicks.
- Hip flexor openers: Deep lunges, low lunge with a twist.
- Quad stretches: Standing or side-lying quad stretch.
- Glute activation: Bridges or clamshells.
- Core work: Planks, boat pose, and dead bugs.
These exercises build the strength and flexibility you need for a safe, full split.
Credit: www.daniwinksflexibility.com
Safety Tips And When To Avoid Splits
While splits are a great goal, they’re not for everyone at every stage. Avoid split training if you have:
- Acute hamstring or groin injuries
- Hip or lower back pain
- Recent surgery in the legs, hips, or pelvis
If you feel a sharp, stabbing pain, stop immediately. Gentle soreness is normal, but pain is a red flag.
For more on safe stretching, check out this resource from the Verywell Fit team.
Real-world Example: Progress Story
Anna, a 35-year-old office worker, started using yoga blocks for splits after feeling stuck for months. She couldn’t get lower than 8 inches from the floor. By practicing with blocks under her hands and thighs three times a week, she reached the floor in both splits within four months. Anna credits her progress to:
- Consistent practice
- Active stretching, not just passive holds
- Focusing on both hamstrings and hip flexors
Her story shows that with the right approach, even adults with stiff muscles can achieve splits safely.
Credit: www.shenyun.org
Frequently Asked Questions
How Many Yoga Blocks Do I Need For Splits?
Most people use two blocks, one for each hand. If you’re very tight, a third block under your front or back thigh can offer extra support.
Are Foam Or Cork Blocks Better For Splits?
Cork blocks are more stable and firm, which many people find helpful for splits. Foam blocks are lighter and softer but can feel less supportive if you put a lot of weight on them.
How Long Does It Take To Achieve Full Splits With Blocks?
It depends on your starting flexibility and how often you practice. Most people see real progress in 2-6 months with consistent, careful stretching.
Can Yoga Blocks Prevent Injuries In Splits?
Yes, blocks help you avoid overstretching and keep good alignment, which lowers your risk of hamstring pulls and hip injuries.
Is It Okay To Practice Splits Every Day?
It’s safe to do gentle stretches daily, but deep split practice should be limited to 3-5 times per week. Always listen to your body and allow time for recovery.
Using yoga blocks for splits is a smart, safe, and effective way to reach new levels of flexibility. With patience, the right technique, and regular practice, you’ll not only get closer to the floor—you’ll do it with healthy muscles and confidence.
Remember, progress is personal, and every inch counts. Happy stretching!