If you spend hours sitting, working, or feeling stiff in your lower body, you’re not alone. Many people experience tight hips from daily life. Modern life encourages sitting, driving, and little movement, which can make hips feel locked or uncomfortable. A simple solution is to add a hip opening sequence in yoga to your weekly routine. This type of yoga practice targets the muscles around your hips, increases your flexibility, and helps you move with ease.
A hip opening sequence is not just for advanced yogis or super flexible people. With the right approach, anyone can benefit—no matter your age, body type, or experience level. In fact, opening your hips can improve your posture, reduce back pain, and even help you feel less stressed.
Let’s explore why hip openers matter, the best yoga poses for hips, and a complete step-by-step sequence you can follow at home.
Why Hip Opening Matters
The hip area is a complex joint that connects your upper and lower body. It’s surrounded by muscles like the hip flexors, glutes, hamstrings, and adductors. When these muscles are tight, it can lead to problems such as:
- Lower back pain
- Poor posture
- Reduced mobility
- Discomfort during exercise or daily activities
Yoga hip openers stretch and strengthen these muscles. They also support better blood flow and release tension that often builds up from stress or inactivity. Studies show that regular hip stretching can reduce pain and improve range of motion, especially for people who sit for long periods.
Many yoga teachers also believe that our hips “store” emotional stress. When you release tightness here, you might notice a lighter mood or sense of relief.
Key Muscles Involved In Hip Opening
Knowing which muscles you’re working can help you focus during yoga. The main muscles include:
- Hip flexors (iliopsoas): These are in the front of your hip and get tight from sitting.
- Glutes (gluteus maximus, medius, minimus): These are your main buttock muscles, important for stability.
- Hamstrings: Run along the back of your thigh, connected to the hip.
- Adductors: Inner thigh muscles that help with balance.
- Piriformis: A small muscle under the glutes, often linked to sciatic pain.
A good hip opening sequence will target all these areas for balanced strength and flexibility.
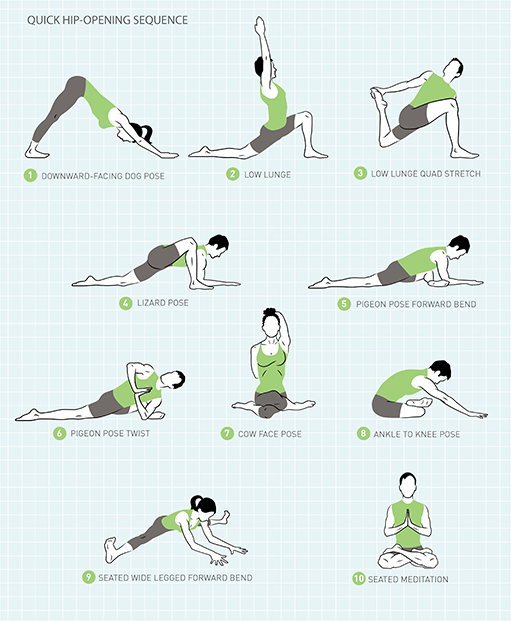
Credit: www.yogadownload.com
Benefits Of A Hip Opening Yoga Sequence
Adding a regular hip opening sequence to your practice has several benefits:
- Better Flexibility: Opens up tight muscles, so you move more freely.
- Pain Relief: Reduces common aches in the lower back and hips.
- Improved Balance: Stronger hips mean better stability in daily life and sports.
- Posture Correction: Helps you stand and sit taller.
- Stress Release: Releases physical and emotional tension.
A 2020 study in the Journal of Bodywork and Movement Therapies found that people practicing hip-focused yoga twice a week reported less hip pain and better function after eight weeks.
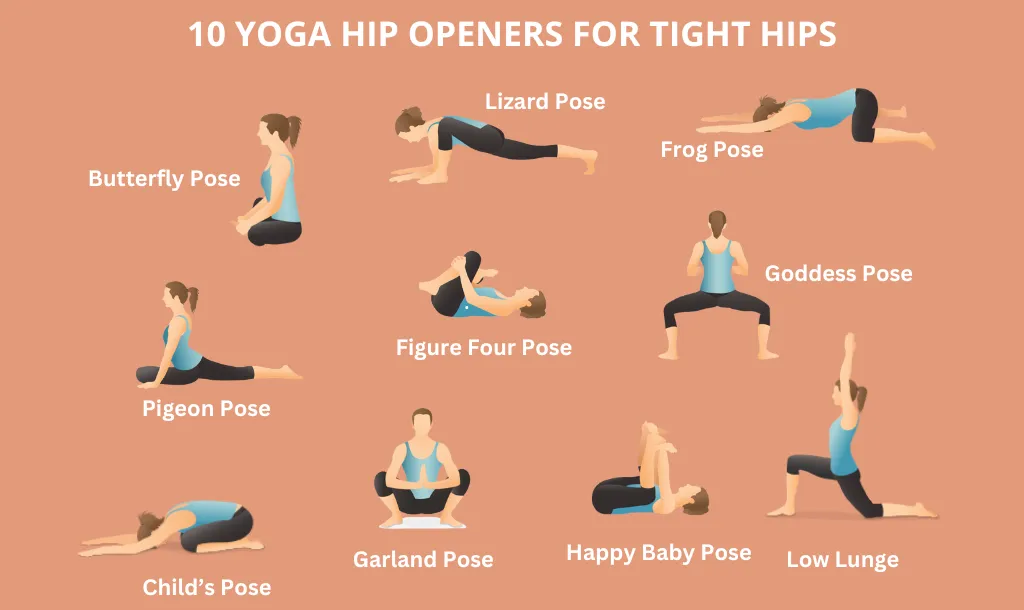
Complete Hip Opening Yoga Sequence
Here’s a step-by-step hip opening yoga sequence you can do at home. You don’t need special equipment—just a mat and comfortable clothes. Hold each pose for 30-60 seconds and repeat on both sides if needed. Breathe deeply and move slowly.
1. Child’s Pose (balasana)
- Kneel on your mat, bring your big toes together, and sit back on your heels.
- Open your knees wide and fold forward, stretching your arms ahead.
- Relax your forehead on the mat and let your hips sink back.
Tip: If your hips are very tight, place a pillow under your belly for comfort.
2. Cat-cow Stretch
- Start on hands and knees, wrists under shoulders, knees under hips.
- Inhale, drop your belly, lift your tailbone and head (Cow).
- Exhale, round your back, tuck your chin and tailbone (Cat).
- Repeat for 5-10 rounds.
Why it works: Warms up the spine and gently loosens hip joints.
3. Downward Facing Dog (adho Mukha Svanasana)
- From hands and knees, lift your hips up and back.
- Straighten your legs as much as comfortable.
- Press your heels toward the mat and relax your head.
Tip: Bend your knees a bit if your hips are very tight.
4. Low Lunge (anjaneyasana)
- Step your right foot forward between your hands.
- Lower your left knee to the mat and untuck your toes.
- Sink your hips forward, stretching the front of your left hip.
- Raise your arms or keep them on your thigh.
Switch sides after 30-60 seconds.
5. Lizard Pose (utthan Pristhasana)
- From low lunge, bring both hands inside your right foot.
- Walk your right foot out a little.
- Lower onto your forearms if possible, keeping your back leg extended.
Tip: If this feels intense, use blocks under your hands.
6. Pigeon Pose (eka Pada Rajakapotasana)
- From hands and knees, bring your right knee toward your right wrist.
- Slide your right ankle toward your left wrist.
- Stretch your left leg back, top of foot on mat.
- Fold forward if comfortable.
Tip: Place a cushion under your hip if it doesn’t reach the floor.
7. Butterfly Pose (baddha Konasana)
- Sit up, bring soles of your feet together.
- Let your knees fall to the sides.
- Hold your feet and gently fold forward.
8. Reclined Figure Four (supta Kapotasana)
- Lie on your back, bend knees, feet on floor.
- Place right ankle on left thigh.
- Thread your arms through and hug your left thigh.
- Switch sides after holding.
9. Happy Baby Pose (ananda Balasana)
- Lie on your back, grab the outsides of your feet.
- Open your knees wider than your torso.
- Pull your knees toward your armpits.
10. Seated Forward Fold (paschimottanasana)
- Sit with legs extended.
- Inhale, reach your arms up.
- Exhale, fold forward, reaching for your feet or shins.
11. Frog Pose (mandukasana)
- Kneel, spread your knees wide while keeping ankles in line.
- Lower your forearms and gently push hips back.
Tip: Place padding under knees for support.
12. Supine Twist
- Lie on your back, arms in a T.
- Bend knees, drop them to one side, look to the opposite.
- Switch sides after holding.
Non-Obvious Insight: Many people forget to breathe deeply during these poses. Slow, steady breaths help muscles relax and make the stretch more effective. Also, never force your hips into a position—they open up gradually with time and patience.
Sample Hip Opening Sequence Plan
Here’s a simple plan you can follow for a balanced practice:
| Pose | Duration | Purpose |
|---|---|---|
| Child’s Pose | 1 minute | Gentle hip stretch, relaxation |
| Cat-Cow | 1 minute | Warm-up, mobilize hips and spine |
| Downward Dog | 1 minute | Hamstring and hip opener |
| Low Lunge | 1 minute/side | Hip flexor stretch |
| Lizard Pose | 1 minute/side | Deep hip and groin stretch |
| Pigeon Pose | 1 minute/side | Glute and hip opener |
| Butterfly Pose | 1 minute | Inner thigh stretch |
| Figure Four | 1 minute/side | Piriformis and hip stretch |
| Happy Baby | 1 minute | Hip and back release |
| Seated Forward Fold | 1 minute | Hamstring and hip stretch |
| Frog Pose | 1 minute | Deep groin opener |
| Supine Twist | 1 minute/side | Spinal and hip release |
This sequence takes about 15-20 minutes and covers all the main hip muscles. Adjust the duration as needed.
Modifications And Safety Tips
Yoga should be safe and enjoyable. Here are some important tips, especially for beginners:
- Use props: Yoga blocks, cushions, or rolled towels can help you reach the floor or support your hips.
- Listen to your body: Never force a pose. If you feel sharp pain, ease out right away.
- Warm up first: Gentle movement or a short walk can make stretching easier.
- Don’t compare: Everyone’s hips are different. Flexibility depends on bone structure as well as muscle tension.
- Stay consistent: Progress is slow but steady. Practice 2-3 times per week for best results.
Many people skip hip openers because they feel uncomfortable at first. But avoiding these stretches can lead to more tightness and pain over time.

Credit: jasonyoga.com
Hip Opening Sequence Vs. Other Yoga Sequences
How does a hip opening yoga sequence compare to other common yoga routines? Here’s a quick look:
| Sequence Type | Main Focus | Best For |
|---|---|---|
| Hip Opening | Hips, glutes, lower back | Reducing stiffness, improving mobility |
| Backbends | Spine, chest, shoulders | Boosting energy, opening chest |
| Twists | Spine, core | Detox, digestion, spinal mobility |
| Standing Poses | Legs, balance | Strength, stability, grounding |
Most yoga practices combine elements from each type, but a hip opening sequence is especially useful if you have a sedentary lifestyle or want to focus on lower body mobility.
Common Mistakes In Hip Opening Yoga
Even experienced yogis can make mistakes with hip openers. Avoid these common issues:
- Holding your breath: This creates tension. Keep breathing deeply.
- Forcing the pose: Trying to go deeper too soon can cause injury.
- Ignoring knee alignment: Knees should always feel comfortable. Protect them by using props or adjusting your position.
- Skipping warm-up: Cold muscles are more likely to strain.
- Comparing to others: Flexibility is unique—focus on your own progress.
Non-obvious insight: Sometimes, the sensation of tightness is actually weakness. If a stretch feels “stuck,” try adding gentle strength exercises for hips and glutes.
Credit: myyogateacher.com
When To Avoid Hip Opening Yoga
While hip openers are safe for most people, there are times to be careful or skip them:
- Recent hip or knee surgery
- Severe hip pain or injury
- Pregnancy (certain poses may not be safe)
- Sciatica (be gentle and consult a doctor)
Always check with a healthcare provider if you have serious medical conditions.
How To Build A Consistent Practice
Sticking with any yoga routine is about creating a habit. Here’s how to make your hip opening sequence regular:
- Set a schedule: Pick specific days and times each week.
- Track your progress: Note which poses feel easier over time.
- Celebrate small wins: Notice improved flexibility or less pain.
- Combine with other activities: Add hip openers after walking or strength training.
Yoga is not a quick fix—results come with patience and practice. You can find more detailed guidance on hip health and yoga at Yoga Journal.
Frequently Asked Questions
What Is A Hip Opening Yoga Sequence?
A hip opening yoga sequence is a series of yoga poses designed to stretch and strengthen the muscles around your hips. These sequences help reduce tightness, improve flexibility, and release tension.
How Often Should I Practice Hip Openers?
For best results, practice 2-3 times per week. Beginners may start with once a week and build up as flexibility improves.
Can Hip Opening Yoga Help With Back Pain?
Yes, tight hips are a common cause of lower back pain. Hip openers can reduce stress on the lower back and improve overall posture.
What If I’m Not Flexible Enough For Some Poses?
Use props like blocks or cushions. Only go as far as feels comfortable—flexibility will improve with time and patience.
Are Hip Opening Poses Safe During Pregnancy?
Some hip openers are safe, but avoid deep stretches and always consult your healthcare provider before starting any new exercise during pregnancy.
A regular hip opening yoga sequence can make a big difference in how you feel and move. Whether you’re new to yoga or looking to deepen your practice, these poses can help unlock tight hips and support your overall health.
Try adding them to your routine, and notice the benefits in your body and mind.