Windmill Pose Yoga: Technique, Benefits, And Practical Insights
Many people look for yoga poses that combine strength, flexibility, and balance. The Windmill Pose (also called Parivrtta Utkata Konasana or Revolved Goddess Pose) stands out because it works the whole body and is easy to learn, but challenging to master. If you want a yoga position that tones your legs, opens your chest, and stretches your sides, this pose is a smart choice.
The Windmill Pose is not as famous as Downward Dog or Warrior II, but it offers unique benefits for both beginners and experienced yogis. It can help you build a stable core, strong legs, and flexible shoulders—skills that support many other yoga poses and daily activities.
In this article, you’ll discover how to do Windmill Pose Yoga safely, what makes it effective, its main benefits, mistakes to avoid, and tips for taking your practice further.
What Is Windmill Pose Yoga?
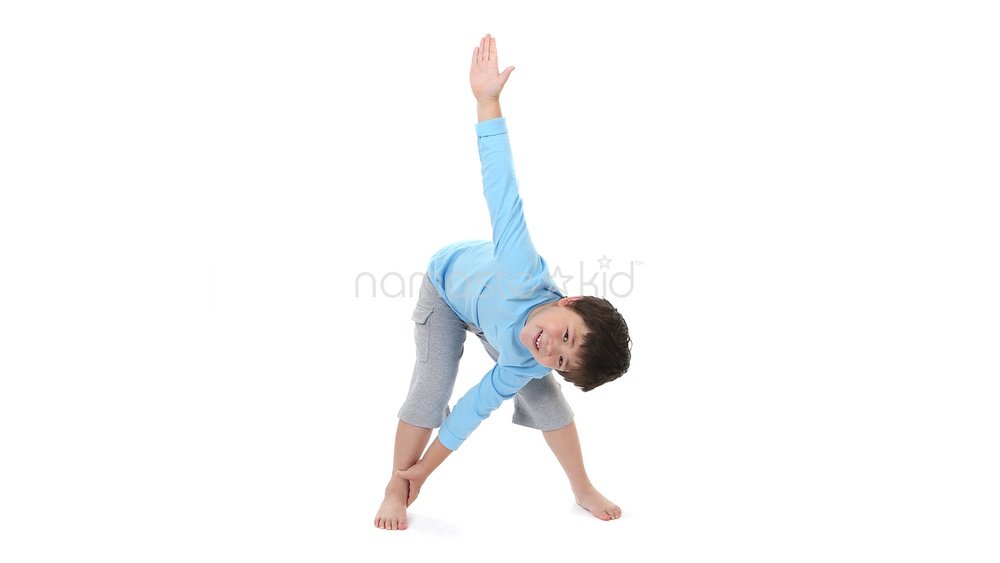
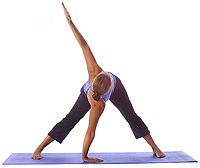
Windmill Pose Yoga is a standing, twisting posture that involves a wide-legged squat and a reaching, rotating movement with your arms. The pose looks similar to the turning blades of a windmill, which is how it gets its name.
In Sanskrit, the pose is often called Parivrtta Utkata Konasana—“parivrtta” means revolved, “utkata” means powerful, and “konasana” means angle pose. Some yoga schools also refer to it as Revolved Goddess Pose.
This posture is both grounding and energizing. It strengthens your lower body and challenges your balance, while also increasing mobility in your back, shoulders, and hips. You don’t need to be a yoga expert to try Windmill Pose, but proper form is important to avoid strain and get the most from your practice.
Step-by-step Guide To Windmill Pose
Doing Windmill Pose Yoga safely and correctly is essential. Here’s a clear, practical breakdown:
- Start in Goddess Pose: Stand with your feet about three feet apart, toes turned out at a 45-degree angle. Bend your knees and lower your hips, keeping your knees in line with your ankles.
- Position Your Arms: Extend your arms out to the sides at shoulder level, palms facing down.
- Set Your Core: Engage your abdominal muscles. Lift your chest and keep your spine long.
- Begin the Twist: Inhale. As you exhale, rotate your torso to the left. Lower your right hand toward your left ankle or the floor, and reach your left arm up toward the ceiling.
- Find Your Balance: Keep your gaze (drishti) either up at your left hand or straight ahead, depending on your neck comfort.
- Hold and Breathe: Stay in the pose for 3-5 slow breaths. Keep pressing your knees outward and your hips low.
- Return and Switch Sides: Inhale back to center, then repeat on the other side.
Key Tips For Good Form
- Keep your spine straight—don’t round your back.
- Try to keep your hips level and facing forward.
- Don’t force your hand all the way to the floor if it strains your lower back.
- Use a yoga block under your bottom hand for support if needed.
Main Benefits Of Windmill Pose Yoga
Windmill Pose Yoga offers several unique advantages. Here’s how it helps your body and mind:
1. Strengthens Legs And Glutes
Holding the squat position works your quadriceps, hamstrings, and gluteal muscles. It builds endurance and stability in your lower body, which is useful for sports and daily activities like climbing stairs.
2. Opens Hips And Chest
As you twist and reach, you stretch your hip flexors and inner thighs (adductors). The upward arm movement opens the chest and shoulders, helping to counteract stiffness from sitting or hunching over screens.
3. Improves Spinal Mobility
The twisting motion gently rotates your spine, which can help maintain or improve your back’s flexibility. Over time, this reduces tension and supports healthy posture.
4. Boosts Core Strength
Keeping your torso stable during the twist requires strong abdominal and oblique muscles. This core activation helps protect your lower back and makes other yoga poses easier.
5. Enhances Balance And Focus
Balancing in a wide squat while twisting challenges your sense of stability and coordination. Practicing this pose can improve your proprioception (body awareness), which is key for preventing falls and moving gracefully.
6. Supports Digestion
Twisting poses are believed to massage the abdominal organs, which may support healthy digestion and relieve bloating or discomfort.
7. Reduces Stress
Focusing on your breath and movement in Windmill Pose can help calm your mind. The combination of physical effort and mindfulness is effective for reducing stress and anxiety.
Muscles Worked In Windmill Pose
Understanding which muscles are active helps you practice the pose safely. Here’s a quick summary:
| Muscle Group | Role in Windmill Pose |
|---|---|
| Quadriceps | Support the squat and knee alignment |
| Gluteus Maximus | Stabilizes hips and controls movement |
| Adductors (Inner Thighs) | Stretch during the wide-legged stance |
| Obliques | Rotate and stabilize the torso |
| Shoulders & Upper Back | Maintain arm position and open chest |
| Spinal Erectors | Keep the spine long and upright |

Credit: www.tummee.com
Common Mistakes And How To Avoid Them
Even experienced yogis make errors in Windmill Pose. Here are mistakes to watch for, and how to fix them:
- Rounding Your Back: Many people collapse their chest or round their lower back, especially when reaching down. Instead, keep your spine long and your chest open.
- Letting Knees Collapse Inward: Your knees should stay above your ankles and point in the same direction as your toes. Press your knees outward for better alignment.
- Over-Twisting the Neck: Forcing your gaze upward can strain your neck. If you feel discomfort, look forward or down.
- Forgetting to Breathe: Holding your breath makes the pose harder. Inhale and exhale slowly to stay relaxed and focused.
- Reaching Too Far: It’s not necessary to touch the floor. Use a block or rest your hand on your shin if that feels better.
Modifications And Variations
Windmill Pose can be adjusted for all skill levels. Here’s how to make it easier or more challenging:
For Beginners
- Use a Yoga Block: Place a block or sturdy book under your lower hand for support.
- Reduce the Squat Depth: Don’t lower your hips as much if your knees or hips feel strained.
- Keep Your Arms Lower: Instead of reaching straight up, keep your top arm on your hip.
For Advanced Practitioners
- Hold Longer: Stay in the pose for 8–10 breaths to build endurance.
- Add a Bind: Bring your lower arm under your thigh and reach your top arm behind your back to clasp your hands.
- Flow Repetitions: Move dynamically between sides for a gentle cardio effect.
How Windmill Pose Compares To Similar Poses
It’s easy to confuse Windmill Pose with other yoga positions. Here’s a comparison with two common poses:
| Pose Name | Main Focus | Key Difference |
|---|---|---|
| Windmill Pose | Twist, squat, hip opening | Wide squat with a twist and reach |
| Triangle Pose (Trikonasana) | Side stretch, hamstring length | Straight legs, less squat, deeper side bend |
| Revolved Chair Pose | Core, legs, twist | Feet together, deeper squat, arms at prayer |
Who Should Practice Windmill Pose?
Windmill Pose Yoga is suitable for most people, but it’s especially helpful for:
- Office workers who sit for long periods and need hip and back mobility
- Athletes who want to build leg endurance and core strength
- Yogis looking to add variety and challenge to their practice
People with knee, hip, or lower back injuries should check with a healthcare provider before practicing. Pregnant women should modify the pose and listen to their bodies.

Credit: www.tummee.com
Sample Windmill Pose Yoga Sequence
You can add Windmill Pose into your yoga routine in many ways. Here’s an example sequence for a balanced practice:
- Mountain Pose (Tadasana) – 5 breaths
- Wide-Legged Forward Fold (Prasarita Padottanasana) – 5 breaths
- Goddess Pose (Utkata Konasana) – 5 breaths
- Windmill Pose (Left Side) – 5 breaths
- Windmill Pose (Right Side) – 5 breaths
- Standing Side Stretch – 5 breaths per side
- Downward Dog – 5 breaths
- Child’s Pose – Rest
This sequence warms up the legs and spine, prepares your body for twisting, and cools down with gentle stretches.
Non-obvious Insights For Windmill Pose
Many beginners miss these practical details:
- Hip Mobility, Not Just Strength: If your hips feel stiff, spend extra time warming up with hip circles or gentle lunges before trying Windmill Pose. Greater hip mobility makes the pose feel lighter and safer.
- Foot Engagement: Press evenly through both feet—especially the outer edges. This subtle action helps protect your knees and keeps your balance steady.
- Arm Line: Instead of only reaching your top arm up, imagine extending your arm diagonally toward the corner of the room. This gives a bigger stretch through your side and chest.
Credit: www.theragear.com
How Often Should You Practice?
For best results, add Windmill Pose to your routine 2-3 times per week. You can hold the pose for a few breaths or include it in a flowing sequence. Over-practicing can lead to fatigue in your knees or hips, so give your body time to recover.
Safety Precautions
Windmill Pose is generally safe, but keep these points in mind:
- Warm up your hips, knees, and spine before starting.
- Move slowly, especially when twisting.
- Stop if you feel sharp pain—especially in your knees, hips, or lower back.
- Pregnant women and people with spinal disc issues should avoid deep twists or ask a yoga teacher for modifications.
If you want more detailed information on pose modifications for injuries, check the Yoga Journal Windmill Pose Guide.
Frequently Asked Questions
What Is The Main Purpose Of Windmill Pose In Yoga?
The main goal of Windmill Pose is to combine a deep leg squat with a twisting stretch, which builds lower body strength, increases hip and chest flexibility, and improves core stability. It’s a holistic pose that supports both physical health and mental focus.
Can Beginners Safely Practice Windmill Pose?
Yes, beginners can do Windmill Pose with simple modifications. Use a yoga block, keep the squat shallow, and focus on good form rather than depth. If you have knee or back problems, consult a yoga teacher or health professional first.
How Long Should I Hold Windmill Pose?
Most people hold Windmill Pose for 3–5 slow breaths on each side. Advanced yogis may hold longer for increased strength and endurance. Listen to your body—if you feel strain, come out of the pose.
What Should I Do If I Feel Pain In My Knees?
If you feel knee pain, ease out of the squat and check your alignment. Your knees should always point in the same direction as your toes. Try a higher squat or use support under your hands. Persistent pain means you should skip the pose and seek guidance.
Is Windmill Pose Good For Weight Loss?
Windmill Pose alone won’t cause major weight loss, but it can help build muscle, boost metabolism, and support an active lifestyle. Combined with regular yoga practice and healthy habits, it contributes to overall fitness.
Windmill Pose Yoga is an effective, dynamic posture that suits many types of yoga practice. With the right technique and smart modifications, you can enjoy better strength, flexibility, and mental clarity. Take your time, focus on alignment, and enjoy the unique challenge this pose brings to your mat.