Are you looking for a way to keep your feet warm and secure during yoga sessions without slipping? Crocheting your own yoga socks might be the perfect solution.
Not only do they provide grip and comfort, but making them yourself lets you customize the style and fit exactly to your needs. Whether you’re a beginner or have some crochet skills, this guide will walk you through simple steps to create cozy, non-slip yoga socks that support your practice and add a personal touch to your workout gear.
Ready to make your own pair? Let’s dive into how to crochet yoga socks that blend function with flair.

Credit: hearthookhome.com
Materials Needed
Before starting your crochet yoga socks project, gather all materials. Having the right supplies makes the process smooth and enjoyable. This section explains the key materials needed to create comfortable and durable yoga socks.
Choosing The Yarn
Select yarn that feels soft against your skin. Cotton or cotton-blend yarns work best for breathability and comfort. Look for yarn with some stretch to allow easy movement. Avoid scratchy or stiff yarns that cause discomfort during yoga practice. Choose colors and textures that appeal to you for a personalized touch.
Selecting Crochet Hooks
Use a crochet hook size recommended on the yarn label. Typically, a 4mm to 5mm hook works well for yoga socks. Smaller hooks create tighter stitches, offering more durability. Larger hooks produce looser stitches for a softer feel. Keep your tension even to maintain a consistent sock size.
Additional Supplies
Gather scissors to cut yarn neatly. Use stitch markers to keep track of rounds or pattern changes. A yarn needle helps weave in ends cleanly. Consider non-slip fabric paint or grips to add traction on the soles. These extras improve the function and finish of your yoga socks.
Basic Crochet Stitches
Crocheting yoga socks starts with knowing basic crochet stitches. These stitches build the foundation of your work. They shape the texture and fit of the socks.
Each stitch has a unique look and function. Mastering these stitches makes your project easier and more fun. Let’s explore three essential stitches: single crochet, double crochet, and slip stitch.
Single Crochet
The single crochet stitch is simple and tight. It creates a dense fabric that holds shape well. This stitch is perfect for the sole of yoga socks, giving strength and durability.
To make a single crochet, insert your hook into the stitch, yarn over, pull through, yarn over again, and pull through both loops on the hook. Repeat this step across your row.
Double Crochet
The double crochet stitch is taller and looser than single crochet. It adds stretch and softness to your socks. Use this stitch for the top part of the yoga socks to allow comfort and flexibility.
Start by yarn over, insert the hook into the stitch, yarn over, pull through, yarn over, pull through two loops, yarn over, and pull through the last two loops. Keep repeating this pattern.
Slip Stitch
The slip stitch is short and flat. It joins pieces or rounds neatly without adding height. This stitch is useful for finishing edges or joining the toe and heel parts of the socks.
To create a slip stitch, insert the hook into the stitch, yarn over, and pull the yarn through both the stitch and the loop on your hook in one move.
Measuring Your Feet
Measuring your feet is the first step in making perfect crochet yoga socks. Proper measurements help ensure the socks fit comfortably and stay in place during yoga practice. Taking accurate measurements avoids making socks too tight or too loose.
Use a flexible tape measure or a piece of string and ruler. Measure both feet because sizes can differ slightly. Focus on length and width to cover the main dimensions of your feet.
Length And Width
Start by measuring the length of your foot from heel to the longest toe. This gives you the total length the sock must cover. Mark the measurement in inches or centimeters, whichever you prefer.
Next, measure the width across the widest part of your foot, usually the ball area. This ensures the sock fits well around your foot’s girth. Write down this width measurement clearly for reference while crocheting.
Considering Fit Preferences
Think about how tight or loose you want your yoga socks to feel. Some people prefer snug socks for better grip and support. Others like a bit more room for comfort and flexibility.
Add extra length or width if you want a relaxed fit. Reduce measurements slightly for a tighter fit. Remember, yarn stretch also affects the final size, so test with your chosen yarn before making the full pair.
Starting The Socks
Starting your crochet yoga socks is an exciting step. This phase sets the base for a comfortable and well-fitting sock. Clear and neat work here ensures your socks will feel great and last long.
Focus on the foundation and toe area carefully. These parts shape the sock and give it its unique fit. Begin with the right stitch count and tension for best results.
Creating The Foundation Chain
Begin by making a slip knot on your hook. This knot will hold your yarn securely as you work. Next, chain the required number of stitches. This chain forms the base width of your sock.
Keep your tension even to avoid loose or tight stitches. Count your chains carefully to match your foot size. This chain will become the sole of your yoga sock.
Forming The Toe Area
After the foundation chain, start working in rounds or rows to shape the toe. Use single crochet stitches for a tight, firm fabric. Increase or decrease stitches to form the curve of the toe.
Make sure the toe fits snugly but comfortably around your toes. This area should be seamless and smooth for comfort. Check your work often by trying on the sock as you crochet.
Crocheting The Body
Crocheting the body of your yoga socks is an essential step. This part shapes the main portion that covers your foot. It ensures comfort and fit while allowing flexibility. Focus on creating a sturdy sole first, then build the top part for a snug fit. Using soft yarn helps maintain breathability and comfort during yoga practice.
Building The Sole
Start by crocheting the sole, which supports your foot. Use a firm stitch to provide strength and durability. Begin with a chain that matches the length of your foot. Work in rounds, increasing stitches at the ends to match foot width. Keep the sole flat and slightly flexible for comfort. The sole should cover from heel to toes precisely.
Working The Top Of The Foot
After the sole, crochet the top part that covers the foot. Use lighter stitches to allow stretch and movement. Work in rows or rounds, depending on your pattern. Shape the sock to fit snugly over the arch and toes. Leave openings if you prefer toe or open-toe designs. The top part must balance snugness and comfort for effective yoga practice.
Adding Toe Separators
Adding toe separators to your crochet yoga socks enhances comfort and flexibility. These separators allow each toe to move freely, improving grip and balance during yoga poses. They also create a stylish, functional design that feels like wearing gloves for your feet.
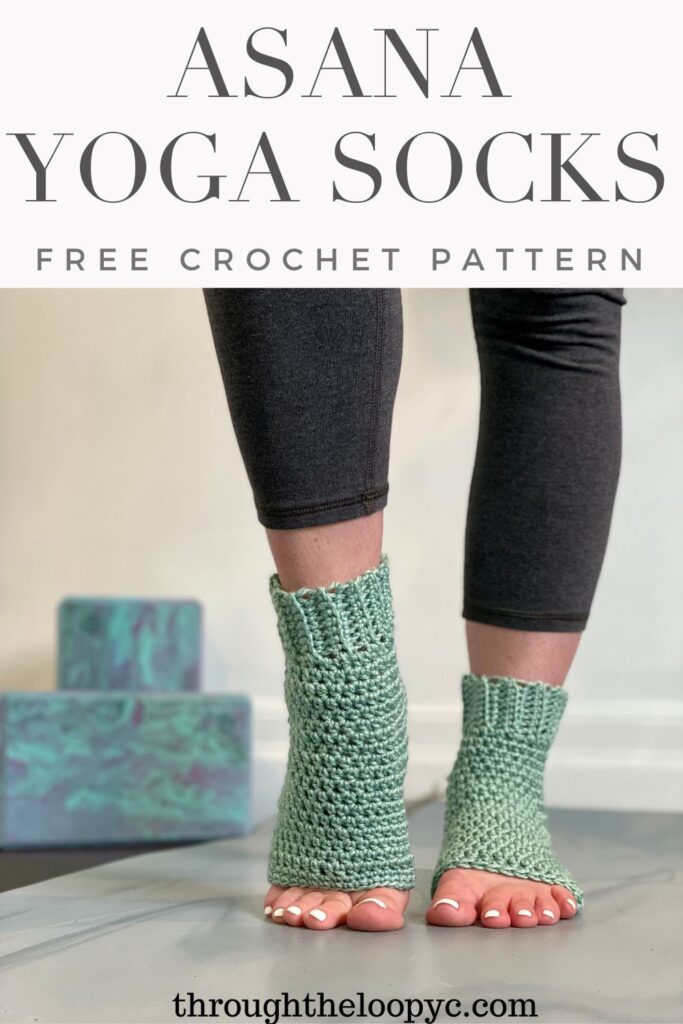
Creating Open-toe Style
The open-toe style keeps toes free while offering some separation. Begin by crocheting the main body of the sock as usual. Leave the toe area open instead of closing it off.
Next, create small loops or bands that go between the big toe and the second toe. These act as gentle separators. Use a soft yarn to avoid discomfort. Attach these loops securely but without tightness.
This style suits yogis who prefer a barefoot feeling but want grip and protection under the foot.
Five-toe Design Tips
The five-toe design separates each toe individually. Start by making a base that fits the foot snugly. Then crochet small tubes or sleeves for each toe. This step requires counting stitches carefully to fit each toe size.
Use stretchy yarn to allow ease of movement. Make sure each toe sleeve is joined firmly to the sole and upper parts of the sock. Keep the stitches even and tight enough to hold shape.
Test the fit often during the process. Adjust the length and width of each toe sleeve to match the wearer’s toes. This design gives maximum toe freedom and better balance.
Crafting The Heel
The heel is a crucial part of crochet yoga socks. It shapes the fit and adds durability. A well-crafted heel keeps the sock snug and comfortable during yoga poses. This section guides you through shaping and comfort techniques for the heel.
Shaping Techniques
Start by working back and forth to form the heel flap. Use short rows or slip stitches for a smooth curve. These methods create a cup-like shape that fits the heel well. Increase or decrease stitches gradually to avoid sharp edges. Choose a stitch pattern that adds stretch and strength. This helps the sock hold its shape during movement.
Ensuring Comfort
Use soft, breathable yarn to prevent irritation. Avoid tight stitches that can pinch the skin. Add extra padding with a thicker stitch or an additional layer. Make sure the heel area is flexible to allow natural foot movement. Check the fit frequently by trying the sock on. Adjust your tension to keep the heel snug but not tight.
Non-slip Grip Application
Adding a non-slip grip to your crocheted yoga socks boosts safety and comfort. It stops slipping on smooth surfaces during yoga or pilates sessions. Applying grips is simple and effective. Two popular methods are using fabric paint and silicone dots. Both create traction without affecting flexibility or style.
Using Fabric Paint
Fabric paint works well for making grips on sock soles. Choose a non-toxic, flexible fabric paint designed for textiles. Squeeze small dots or lines on the areas that touch the floor. Focus on the heel, ball of the foot, and toes for best grip. Let the paint dry completely before wearing the socks. This method keeps the grip thin and durable. It also allows for creative patterns or designs.
Applying Silicone Dots
Silicone dots offer strong traction and a raised texture. You can buy silicone grip pads or use liquid silicone from a craft store. Apply dots evenly across the sole in rows or clusters. Press lightly to help them stick into the yarn. Let them cure for 24 hours or as instructed. Silicone dots last longer and resist washing better than paint. They add a professional finish to your yoga socks.
Customizing Your Socks
Customizing your crochet yoga socks lets you create a unique pair that fits your style and needs. Personal touches make your socks stand out. You can experiment with colors and stitches to add personality. This section shows simple ways to customize your socks.
Adding Color Patterns
Use different yarn colors to create stripes or blocks. Change colors every few rows for bold patterns. Try combining light and dark shades for contrast. You can also add small color accents on the toes or heels. Color patterns brighten your socks and make them fun to wear.
Incorporating Stitch Variations
Mix different crochet stitches to add texture and interest. Use simple stitches like single crochet or half double crochet to keep it easy. Try shell or bobble stitches for a raised effect. Stitch variations can make your socks softer or more stretchy. These small changes give your socks a unique look and feel.
Care And Maintenance
Proper care and maintenance keep your crochet yoga socks soft and durable. Clean socks feel fresh and last longer. Follow simple steps to protect your work and maintain comfort.
Washing Instructions
Hand wash your crochet yoga socks with mild soap. Use cold or lukewarm water to avoid shrinking. Gently squeeze out water; do not wring or twist. Avoid bleach or harsh detergents that damage fibers. Lay flat on a towel to air dry. Do not use a dryer, as heat can distort the shape.
Storing Tips
Store socks in a cool, dry place away from direct sunlight. Fold them neatly to prevent stretching or misshaping. Keep them in a breathable fabric bag or drawer. Avoid plastic bags that trap moisture and cause mildew. Regularly check for any signs of wear or damage. Proper storage keeps your socks ready for your next yoga session.
Yoga Socks Vs Pilates Socks
Yoga socks and Pilates socks share many features but serve slightly different needs. Both types offer grip and comfort during practice. Understanding their differences helps you choose the best pair for your workout.
Design Differences
Yoga socks often have open-toe or five-toe designs. This style allows better toe movement and balance. The soles usually feature silicone grips to prevent slipping on mats. Pilates socks also have similar grip patterns but are designed for use on Pilates machines. They often provide extra cushioning and stronger grips. Pilates socks sometimes cover more of the foot for added protection. Both types come in breathable materials to keep feet dry and comfortable.
Usage Considerations
Yoga socks are mostly optional. Some yoga studios require them for hygiene on shared mats. Many people wear them for extra grip and warmth. Pilates socks are more necessary, especially for reformer Pilates classes. They improve safety by preventing slips on machine surfaces. Pilates socks also help keep machines clean from sweat and dirt. Choosing the right socks depends on your activity and studio rules. Both styles improve stability and comfort during exercise.

Credit: www.ravelry.com
Credit: www.throughtheloopyc.com
Frequently Asked Questions
How To Make Yoga Socks?
To make yoga socks, choose breathable fabric and cut toe areas. Add non-slip grip using fabric paint on toes, heels, and ball of foot. Sew edges neatly for durability. Customize style and fit for comfort during practice.
What Is The Difference Between Yoga Socks And Pilates Socks?
Yoga socks offer optional grip and hygiene mainly for mat use, while Pilates socks provide essential stability and hygiene for reformer machines. Both have non-slip soles and similar toe designs, but Pilates socks often use moisture-wicking fabrics due to more intense workouts.
Is It Better To Crochet Or Knit Socks?
Knitting creates stretchier, softer socks with better fit. Crocheting makes thicker, warmer, and sturdier socks. Choose based on comfort and use.
Can A Beginner Crochet Socks?
Yes, beginners can crochet socks by starting with simple patterns and practicing basic stitches. Using easy tutorials helps build confidence.
Conclusion
Crocheting your own yoga socks brings comfort and style to your practice. These socks offer grip and warmth, making poses safer and more enjoyable. The process is simple and fun, even for beginners. Personalize colors and patterns to match your taste.
Handmade yoga socks also make thoughtful gifts for friends. Keep practicing your crochet skills to improve with each pair. Enjoy the blend of creativity and relaxation in every stitch. Start your crochet project today and feel the difference on your mat.