Are you ready to create your very own yoga bolster cushion that fits your needs perfectly? Making a yoga bolster cushion from scratch might sound tricky, but it’s easier than you think.
Imagine having a cushion that supports your body just right during every stretch and pose. In this guide, you’ll discover simple steps to craft a cozy, durable bolster that feels like it was made just for you. Keep reading, and by the end, you’ll have a custom cushion that transforms your yoga practice and adds comfort to your relaxation time.
Credit: uzlet-online.hu
Materials Needed
Making a yoga bolster cushion requires the right materials. Choosing good fabric, filling, and tools ensures a comfy, durable cushion. Gather everything before starting your project. This helps the process go smoothly.
Fabric Choices
Select fabric that feels soft and strong. Cotton and linen work well. They allow the cushion to breathe and last long. Avoid slippery or thin fabric. Bright colors or simple patterns fit any yoga space.
Filling Options
The filling affects the cushion’s comfort and firmness. Polyester fiberfill is light and fluffy. Buckwheat hulls offer firm, natural support. Foam pieces give a soft but steady feel. Choose filling based on your comfort needs.
Tools Required
Gather these tools before sewing. A sewing machine speeds up work but hand sewing is fine. You need scissors to cut fabric neatly. Pins hold pieces in place. A measuring tape helps keep sizes correct. A zipper or buttons finish the cushion cover.

Credit: happysnapgifts.co.uk
Preparing The Fabric
Preparing the fabric is the first step in making your yoga bolster cushion. This step ensures your cushion will have a neat shape and last long. Choose a fabric that feels strong and soft to the touch.
Use a clean, flat surface to prepare your fabric. Iron out any wrinkles before measuring. Smooth fabric helps to get accurate cuts and clean edges.
Measuring And Cutting
Measure the fabric carefully to fit the bolster size you want. Include extra length for seams and stuffing. Use a ruler or measuring tape for precision.
Mark the fabric lightly with a pencil or fabric chalk. Avoid sharp tools that can damage the fabric. Cut the fabric slowly and steadily to keep straight lines.
Marking Seam Allowances
Mark seam allowances around the edges of your fabric pieces. A common allowance is about half an inch. This space is important for sewing the pieces together.
Use a clear ruler to draw straight seam lines. Double-check your marks before cutting. Proper seam allowances prevent fabric from fraying and ensure a perfect fit.
Sewing The Cushion Cover
Sewing the cushion cover is the next important step. It protects the stuffing and gives your bolster a neat look. A well-made cover fits tightly and stays in place during use. You can choose soft, durable fabric for comfort and style. Follow simple sewing steps to create a strong, clean cover that lasts.
Stitching The Sides
Start by cutting two pieces of fabric to match your bolster size. Place them right sides together. Pin the edges to keep them aligned. Sew along the long sides with a straight stitch. Leave the short ends open for stuffing and closure. Use a ½ inch seam allowance for strength. Backstitch at the start and end to secure the stitches.
Creating A Zipper Or Closure
A zipper or closure lets you remove the cover for washing. Choose a zipper that matches your fabric length. Pin the zipper along one open edge, right sides together. Sew carefully close to the zipper teeth. For no zipper, use buttons or Velcro strips. Attach them evenly along the open edge. Make sure the closure is strong and easy to use.
Filling The Bolster
Filling the yoga bolster is a key step in making it comfortable and supportive. The right filling affects how firm or soft the cushion feels. Choosing the correct material helps the bolster keep its shape over time. Proper filling techniques ensure even distribution inside the cover. This part of the process needs care and attention to detail.
Choosing The Right Filling
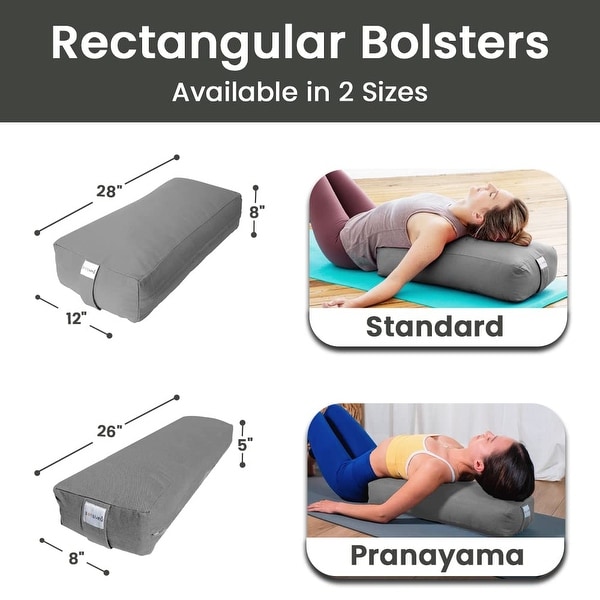
Natural fillings like cotton or kapok are soft and breathable. They provide gentle support and stay cool during use. Polyester fiberfill is a budget-friendly option. It is lightweight and easy to shape. Buckwheat hulls are firm and moldable. They offer excellent support but feel heavier. Foam pieces give consistent firmness and last long. Consider your comfort preference and budget before deciding.
Filling Techniques
Start by loosely adding the filling. Avoid overpacking to keep the cushion flexible. Use your hands to spread the filling evenly. Check for lumps or empty spots as you fill. Press the bolster gently to test firmness. Add or remove filling until it feels right. Close the cover securely to keep the filling inside. Smooth the surface by patting and shaping the bolster.
Finishing Touches
Finishing touches make your yoga bolster look neat and last long. They help keep the stuffing inside and give a clean, polished look. Small details show your care and make the cushion special.
Closing The Cushion
After filling your bolster, close the open end carefully. Fold the edges inward to hide raw fabric. Use strong thread and small stitches to sew it shut. Sewing by hand or machine works well. Make sure the stitches are tight. This prevents stuffing from coming out during use.
Adding Decorative Elements
Decorations add style and personality to your cushion. You can sew simple buttons or fabric patches on the cover. Use ribbons or lace for a soft look. Choose colors that match your yoga space. Decorations also help you find your bolster easily. Keep decorations safe and secure so they don’t fall off.
Care And Maintenance Tips
Taking good care of your yoga bolster cushion keeps it fresh and comfortable. Proper care helps the cushion last longer and stay supportive. Follow simple steps to keep your cushion clean and in shape.
Cleaning The Cover
Remove the cover before cleaning. Most covers can be machine washed on a gentle cycle. Use mild detergent to avoid damage. Air dry the cover to prevent shrinking. Avoid using bleach or harsh chemicals. Regular cleaning removes sweat, dust, and oils.
Maintaining Shape And Support
Fluff the cushion often to keep its shape. Press and knead the bolster gently to redistribute the filling. Avoid sitting or standing on the cushion to prevent flattening. Store it in a dry place away from direct sunlight. Proper storage stops the filling from clumping or breaking down.

Credit: www.youtube.com
Frequently Asked Questions
What Materials Do I Need To Make A Yoga Bolster Cushion?
You need firm fabric, polyester stuffing or buckwheat hulls, a zipper, sewing needle, and thread. Choose durable, washable materials for comfort and longevity.
How Do I Sew A Yoga Bolster Cushion Cover?
Cut fabric to size, sew three sides, insert stuffing, then sew the last side or attach a zipper. Ensure seams are strong for support.
What Filling Is Best For Yoga Bolster Cushions?
Buckwheat hulls offer firm support and breathability. Polyester stuffing is softer and lighter. Choose based on your comfort preference.
How Do I Maintain And Clean My Homemade Yoga Bolster?
Remove cover if possible and wash according to fabric instructions. Spot clean the filling with mild detergent and air dry thoroughly.
Conclusion
Making a yoga bolster cushion from scratch is simple and rewarding. You choose the fabric, stuffing, and size yourself. This cushion supports your body during yoga and helps you relax better. Crafting your own also saves money and lets you customize it.
Try making one today and enjoy the comfort it brings. Small efforts can lead to great comfort and peace. Keep practicing and improving your cushion for the best yoga experience.
So,how to make a yoga bolster cushion from scratch perfectly? It depends on choosing clothes to available found kit & follow our guide with no compromise.