Learning how to sit yoga cross-legged might seem simple, but if you’ve ever felt discomfort or pain while trying it, you’re not alone. Your body needs the right position and support to make this pose comfortable and sustainable.
Imagine sitting with your hips elevated, your spine straight, and your legs gently crossed without strain. This not only improves your posture but also deepens your yoga practice, making every session more enjoyable and effective. In this guide, you’ll discover easy steps and helpful tips to master sitting cross-legged with ease, even if you’ve struggled before.
Ready to transform your sitting experience and unlock greater comfort? Keep reading to find out how.
Prepare Your Seat
Preparing your seat is a key step to sit yoga cross-legged comfortably. Proper preparation helps keep your spine straight and hips relaxed. It reduces strain and supports longer, pain-free practice. The right setup balances your body and eases pressure on joints.
Use Cushions For Elevation
Place a cushion or folded blanket under your hips. This raises the hips above the knees. Elevation helps tilt the pelvis forward naturally. It opens the hips and reduces tension in the lower back. Soft cushions provide gentle support without sinking too much. Adjust the height to find what feels stable and easy.
Choose A Firm Surface
Sit on a firm, flat surface like a yoga mat or wooden floor. A solid base prevents sinking and keeps your posture steady. Avoid overly soft or uneven surfaces that cause imbalance. Firm ground helps maintain alignment from hips to spine. It also improves focus and comfort during your practice.
Position Your Legs
Positioning your legs correctly is vital for a comfortable cross-legged yoga seat. Proper leg placement supports your spine and helps maintain balance. It reduces strain on your hips and knees. This part of the pose sets the foundation for a steady and relaxed practice.
Cross One Ankle Over The Other
Begin by sitting on a cushion or folded blanket. This raises your hips above your knees. Place one ankle over the opposite ankle gently. Your shins should form an “X” shape in front of you. Keep your feet relaxed, not tense or curled. This position creates a stable base and opens your hips slowly. Avoid forcing your legs if you feel discomfort. Switch which ankle is on top in different sessions to keep balance in your hips.
Support Knees With Props
Use yoga blocks, cushions, or folded blankets under your knees. These props give extra support and ease pressure on your joints. They help keep your knees lower than your hips. This reduces tightness and pain during sitting. Adjust the height of the props to what feels best for you. Support under the knees prevents strain and helps keep your spine straight. Props make the pose accessible for all levels and body types.
Align Your Spine
Aligning your spine is essential for a comfortable and effective cross-legged yoga pose. A straight spine helps maintain balance and prevents strain. It also improves breathing and focus during your practice.
Proper alignment starts with awareness. Feel your spine lengthen from the base to the top. Avoid slouching or leaning too far back. Instead, find a natural, upright position that feels steady and relaxed.
Engage Your Core
Activate your abdominal muscles gently. This support keeps your spine stable. A strong core prevents your back from collapsing or arching unnaturally. Keep your belly soft but firm to maintain balance.
Stack Shoulders Over Hips
Position your shoulders directly above your hips. This alignment helps distribute your weight evenly. Avoid leaning forward or backward. Keep your chest open and your shoulders relaxed but firm.

Credit: www.yogabasics.com
Adjust Your Posture
Adjusting your posture is key to sitting cross-legged comfortably in yoga. A proper posture helps you stay relaxed and focused. It prevents strain on your back and hips. Small changes in how you hold your body make a big difference. These tips guide you to find a balanced and stable pose.
Lean Forward Gently
Lean your torso forward slightly from the hips. This shift helps you sit more upright. Avoid bending from the waist or slumping. A gentle forward lean opens your hips and reduces tension. It creates space between your lower back and the floor. Keep your shoulders relaxed and away from your ears. This simple move improves comfort and balance.
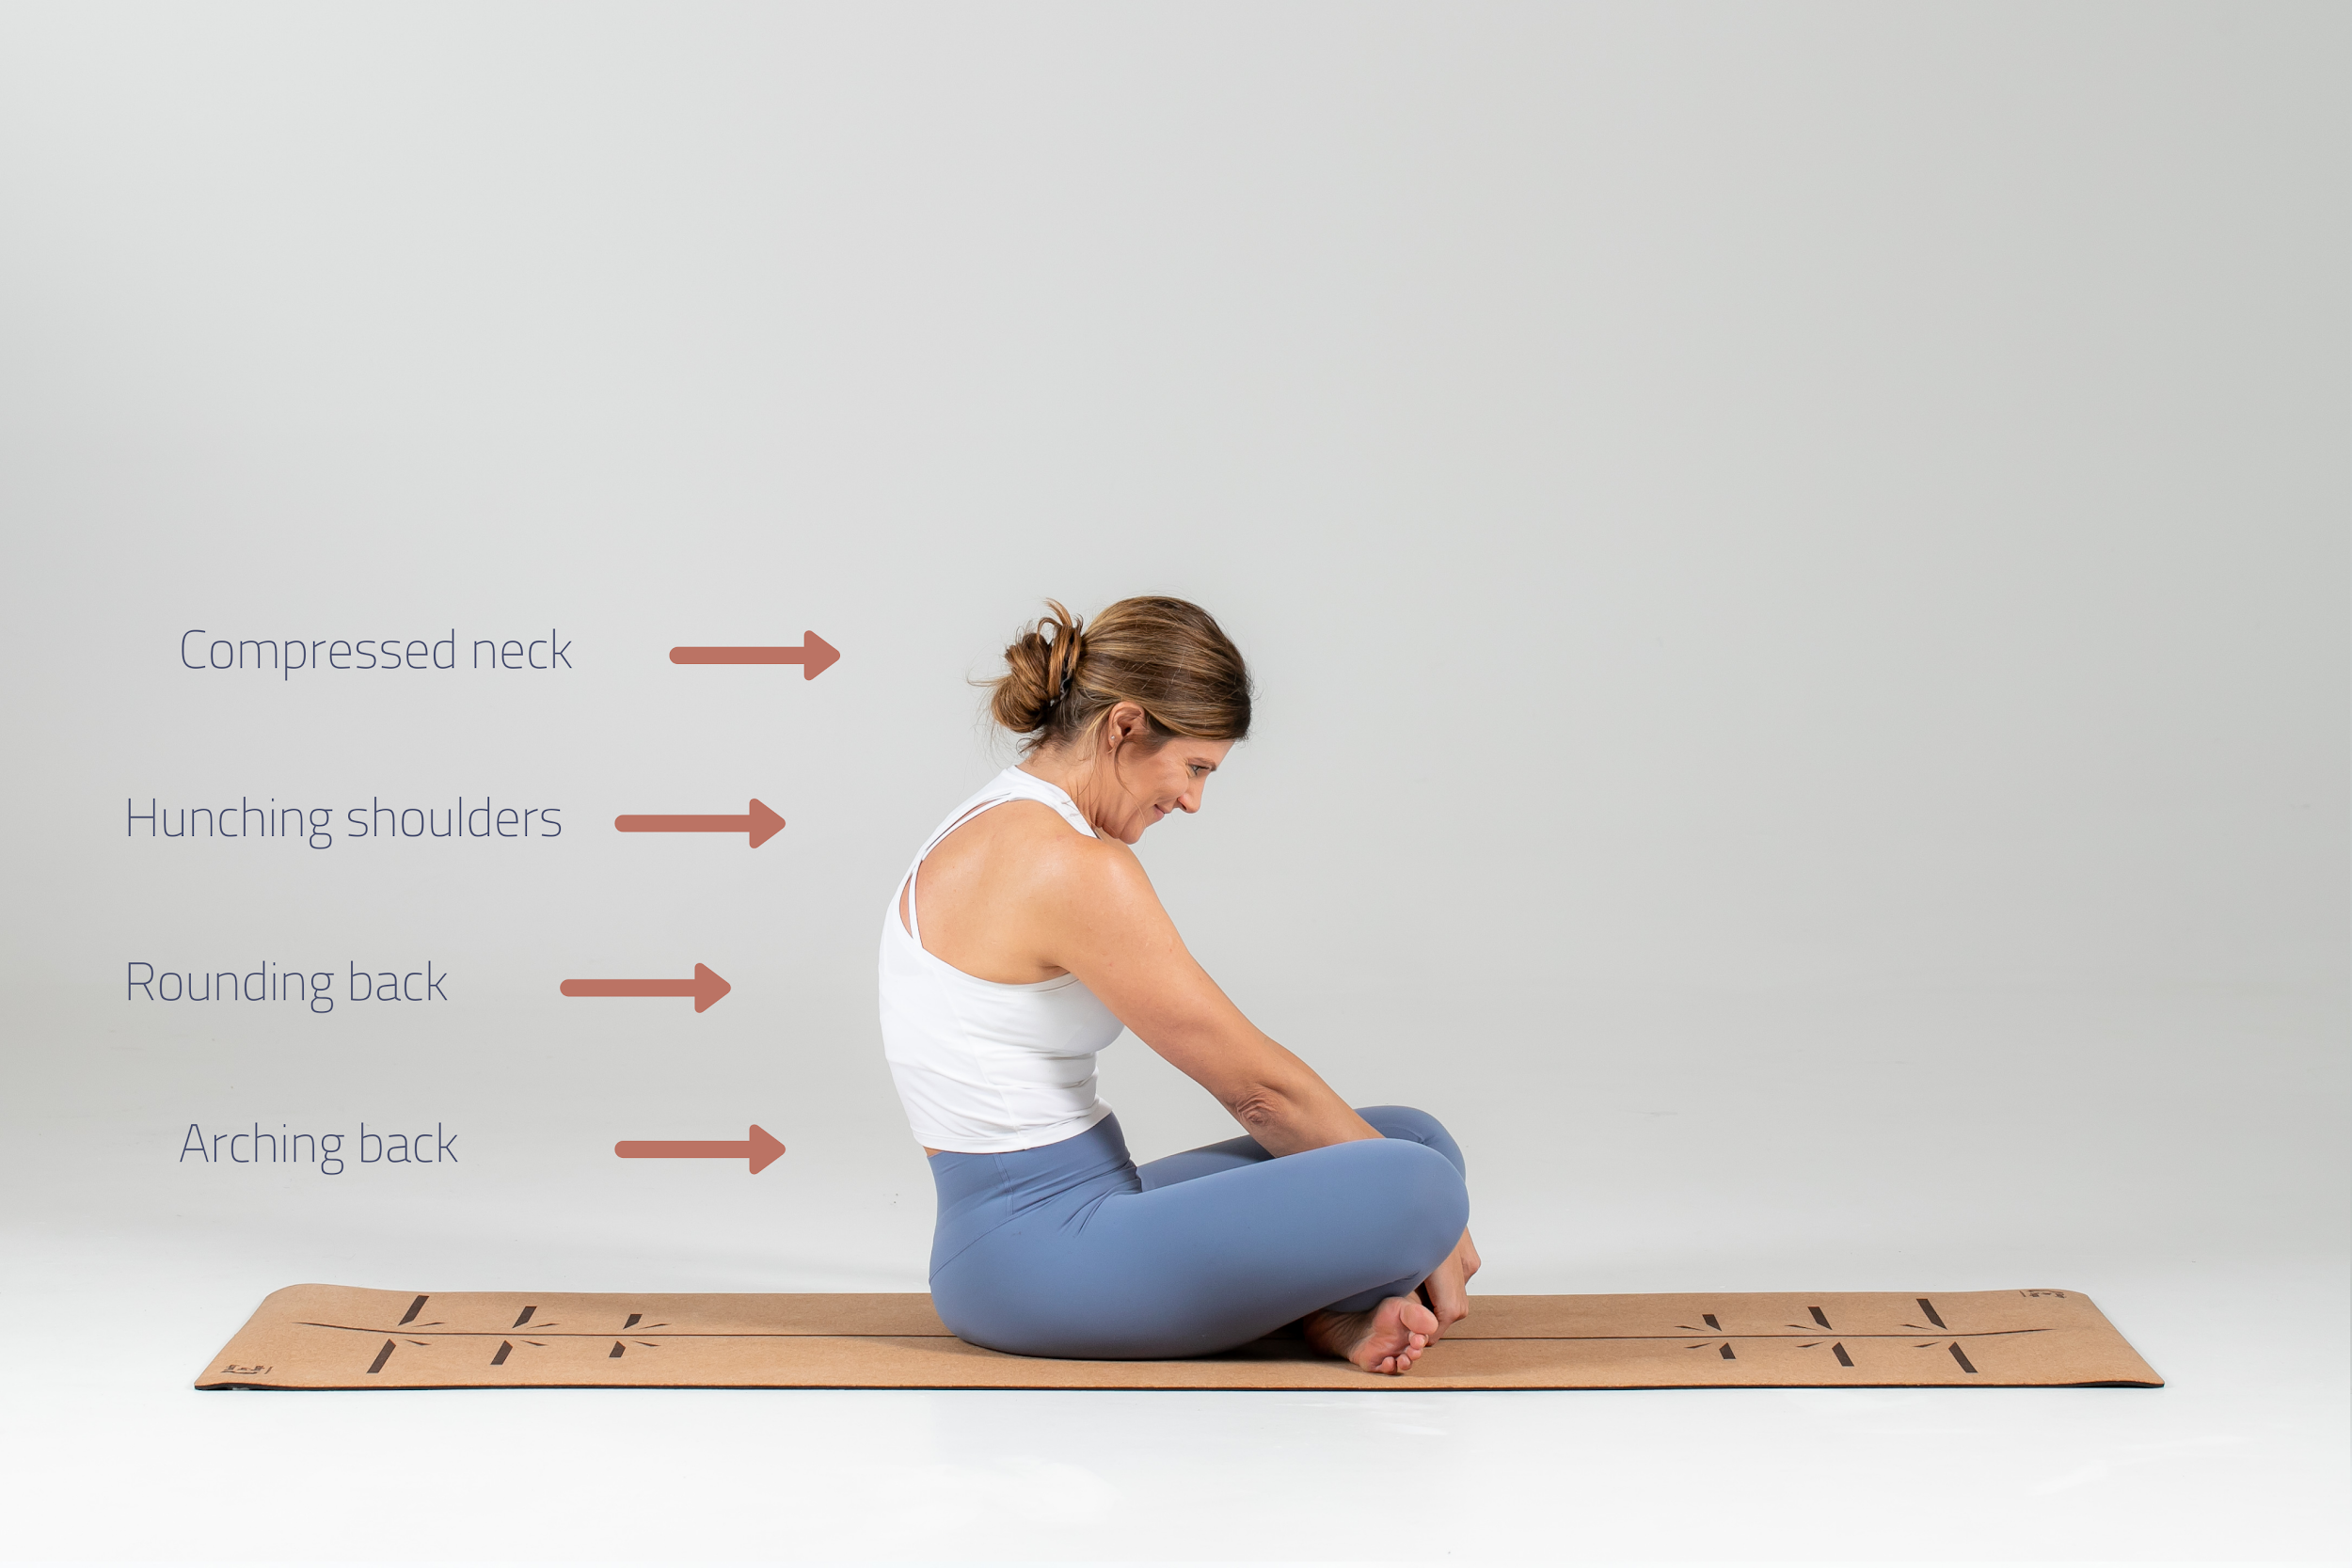
Avoid Rounding Or Arching Back
Keep your spine neutral and straight. Do not let your back round or arch too much. Rounding causes slouching and stress on your spine. Arching strains your lower back muscles. Imagine a string pulling the top of your head toward the ceiling. This helps lengthen your spine. Engage your core muscles lightly for support. A straight back helps breathing and focus during yoga.
Balance Both Sides
Balancing both sides while sitting yoga cross-legged helps maintain body symmetry. This balance prevents muscle tightness and reduces discomfort. It also promotes better posture and alignment during your practice. Focusing on equal effort on both sides creates a stable and comfortable seated position. This section explains simple ways to achieve that balance.
Switch Which Leg Is On Top
Alternate the leg you place on top each time you sit cross-legged. This switch helps stretch and strengthen muscles evenly on both sides. It prevents one side from becoming tighter or stronger than the other. Try to keep your hips level and your spine straight during each switch. This small change supports balanced flexibility and comfort over time.
Practice Symmetry Regularly
Make sitting cross-legged with balanced sides a regular habit. Practice daily to train your body for symmetry. Use props like cushions or blankets under your hips to keep your posture aligned. Focus on equal weight distribution on both sit bones. Regular practice improves muscle balance and reduces strain on one side.
Improve Hip Flexibility
Improving hip flexibility is key to sitting yoga cross-legged with ease. Tight hips limit your ability to sit comfortably for long periods. Stretching the hip muscles gently prepares your body for this pose. Consistent practice helps increase mobility and reduces strain.
Start with simple stretches that open the hips. These moves relax the muscles and create space around the hip joints. Focus on gentle, controlled movements. Avoid pushing too hard or causing pain. Over time, your hips will feel looser and more flexible.
Butterfly Stretch
Sit with your feet together and knees bent outward. Hold your feet with your hands. Gently press your knees toward the floor. Keep your back straight and breathe deeply. This stretch targets the inner thighs and hips. Hold for 20-30 seconds. Repeat 2-3 times for best results.
Figure-four Stretch
Lie on your back and cross your right ankle over your left thigh. Reach behind your left thigh and pull it toward your chest. Keep your head and shoulders relaxed on the floor. Feel the stretch in your hips and glutes. Hold for 20-30 seconds. Switch sides and repeat.
Child’s Pose For Release
Begin on your hands and knees. Sit back onto your heels while stretching your arms forward. Rest your forehead on the floor. This pose gently opens the hips and releases tension. Stay here for 30 seconds to one minute. Breathe deeply and relax your hips with each exhale.
Modify For Comfort
Modifying your cross-legged yoga pose helps avoid discomfort. It supports longer, focused practice without pain. Small adjustments make a big difference in comfort and alignment. Listen to your body and create a setup that feels good for you.
Use Blocks Or Pillows
Place a block or pillow under your hips. This lifts them above your knees. It eases pressure on your hips and lower back. You can also use folded blankets under your knees. These props help keep your spine straight and reduce strain. Adjust the height to what feels best for you.
Take Breaks When Needed
Take short breaks during your practice. Stand up or stretch your legs every few minutes. This prevents stiffness and improves blood flow. Sitting cross-legged can be tough at first. Breaks help your muscles relax and reduce discomfort. Return to the pose refreshed and more comfortable.
Credit: bodybyyoga.training
Incorporate Into Routine
Incorporating sitting yoga cross-legged into your daily routine helps build comfort and flexibility. Regular practice trains your body to maintain proper posture with ease. It also reduces stiffness in hips and knees. Over time, sitting cross-legged feels natural and relaxing. Consistency is key for progress and benefits.
Practice Daily
Set aside a few minutes each day to sit cross-legged. Start with short sessions and increase time gradually. Daily practice improves hip flexibility and strengthens your core. It also trains your back to stay straight without strain. Make this a quiet moment for yourself, free from distractions. Consistency shapes your body’s ability to hold the pose comfortably.
Combine With Breathing Exercises
Pair sitting cross-legged with deep breathing exercises. Focus on slow, steady breaths to calm your mind and body. Breathing deeply enhances relaxation and improves oxygen flow. This combination helps reduce tension in muscles around hips and back. Try inhaling through your nose and exhaling fully through your mouth. Breath awareness also keeps your posture steady and aligned.
Credit: www.alamy.com
Frequently Asked Questions
Why Can’t I Sit Cross-legged In Yoga?
You can’t sit cross-legged in yoga due to tight hip or leg muscles. Elevate hips on a cushion to ease pressure. Use props under knees for support. Practice hip stretches regularly to increase flexibility and comfort. Keep your spine straight and engage your core while sitting.
How To Train Yourself To Sit Cross-legged?
Sit on a cushion to raise hips above knees. Cross ankles gently, keep back straight, and engage your core. Support knees if needed. Practice hip stretches like butterfly pose. Alternate leg positions for balance and comfort.
How To Sit A Cross-legged Yoga Pose?
Sit on a cushion to elevate hips above knees. Cross legs with one ankle over the other. Keep your back straight and shoulders aligned. Engage your core and maintain an upright posture. Use support under knees if needed for comfort and flexibility.
Switch leg positions for balance.
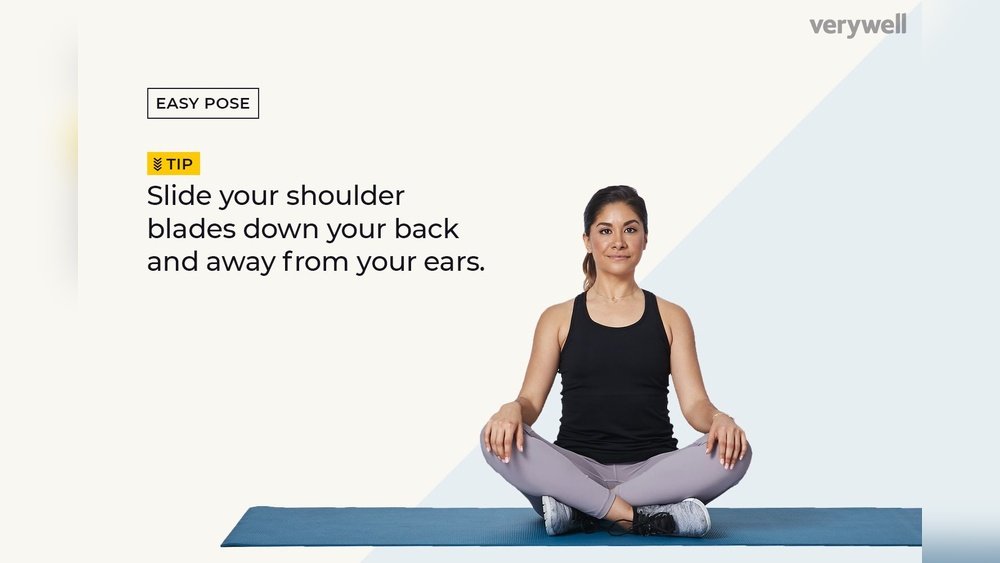
What Is Sitting Cross-legged Called In Yoga?
Sitting cross-legged in yoga is called Sukhasana or Easy Pose. It promotes spine alignment and hip flexibility. Elevate hips on a cushion for comfort. Keep your back straight, shoulders over hips, and engage your core to maintain an upright posture.
Conclusion
Sitting cross-legged in yoga feels easier with practice and patience. Use cushions to raise your hips above your knees. Keep your back straight and shoulders relaxed for good posture. Switch the leg on top to balance your body. Gentle hip stretches help improve flexibility over time.
Always listen to your body and avoid pain. Comfort and alignment matter more than perfect form. Small daily efforts lead to steady progress in sitting cross-legged. Enjoy the calm and focus this pose brings to your practice.