Yoga is more than just physical movement; it’s a way to connect mind, body, and breath. One of the most recognized postures in yoga is Warrior 1 (Virabhadrasana I). This powerful pose is seen everywhere from beginner classes to advanced practices. But why is Warrior 1 so important, and how do you really master it? Many people copy the shape without understanding the full depth and details behind it. If you want to unlock the true benefits, it’s worth taking a closer look at every part of this pose.
What Is Warrior 1 Pose?
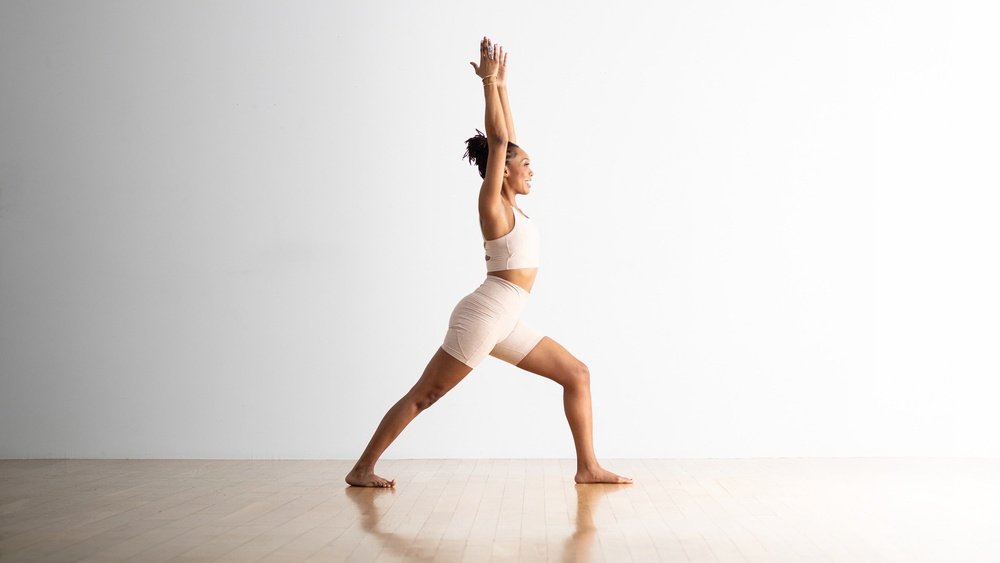
Warrior 1, or Virabhadrasana I, is a standing yoga pose. In Sanskrit, “Vira” means hero or warrior, “Bhadra” means friend, and “Asana” means pose. When you do Warrior 1, you look strong and confident—like a hero ready for action. But it’s not just about looking powerful. This pose builds real strength, flexibility, and focus.
How To Do Warrior 1 Pose Step-by-step
Getting into Warrior 1 may seem simple, but the details matter. Here’s how you can practice it safely and correctly:
1. Start In Mountain Pose (tadasana)
Stand at the front of your mat, feet together, arms by your sides. Take a few deep breaths to center yourself.
2. Step Your Foot Back
Step your left foot back about 3. 5 to 4 feet. Your right foot stays facing forward, and your left foot turns out slightly (about 45 degrees). The heel of your right foot lines up with the heel or arch of your left foot.
3. Bend The Front Knee
Bend your right knee so it stacks directly above your ankle. Your thigh should be parallel to the ground if possible. The left leg stays straight and strong.
4. Square Your Hips Forward
Here’s where many people go wrong. Move your left hip forward and your right hip back, so your hips face the front of your mat. This may require shortening your stance or turning your back foot in a bit more.
5. Lift Your Arms Overhead
Raise both arms up toward the ceiling, palms facing each other or touching. Keep your shoulders relaxed away from your ears.
6. Engage Your Core And Legs
Press the outer edge of your back foot into the mat. Engage your thigh muscles. Draw your belly in gently.
7. Gaze Forward Or Up
Look straight ahead or up at your hands. Hold for 5–10 breaths.
8. Switch Sides
To release, step forward and repeat on the other side.
Key Benefits Of Warrior 1
Warrior 1 is not just for photos. Practicing this pose regularly can bring real changes:
- Strengthens legs and glutes: The lunge shape builds muscle in your thighs, calves, and hips.
- Opens hips and chest: Warrior 1 stretches your hip flexors and shoulders.
- Improves balance and stability: You’ll feel your core working to keep you upright.
- Boosts focus and energy: The strong stance and lifted arms help you feel alert and confident.
- Stretches ankles and calves: The back foot’s position gives a gentle stretch to your lower leg.
Common Mistakes And How To Fix Them
Even experienced yogis can miss the details in Warrior 1. Here are some mistakes to watch for and how to adjust:
1. Front Knee Caves In
Your front knee should point forward, not collapse inward. Press it gently toward the pinky-toe side of your foot.
2. Back Heel Lifts Off
If your back heel pops up, shorten your stance. Focus on grounding the outer edge of your back foot.
3. Hips Twist To The Side
Many people let their hips open to the side. Instead, actively move your back hip forward and front hip back.
4. Shoulders Up By Ears
Keep your shoulders relaxed, even as you lift your arms. If needed, bend your elbows slightly.
5. Back Leg Collapses
Press your back leg straight and strong. Imagine you’re pushing the wall away with your heel.
6. Overarching The Lower Back
Draw your tailbone down and your belly in to avoid crunching your lower back.
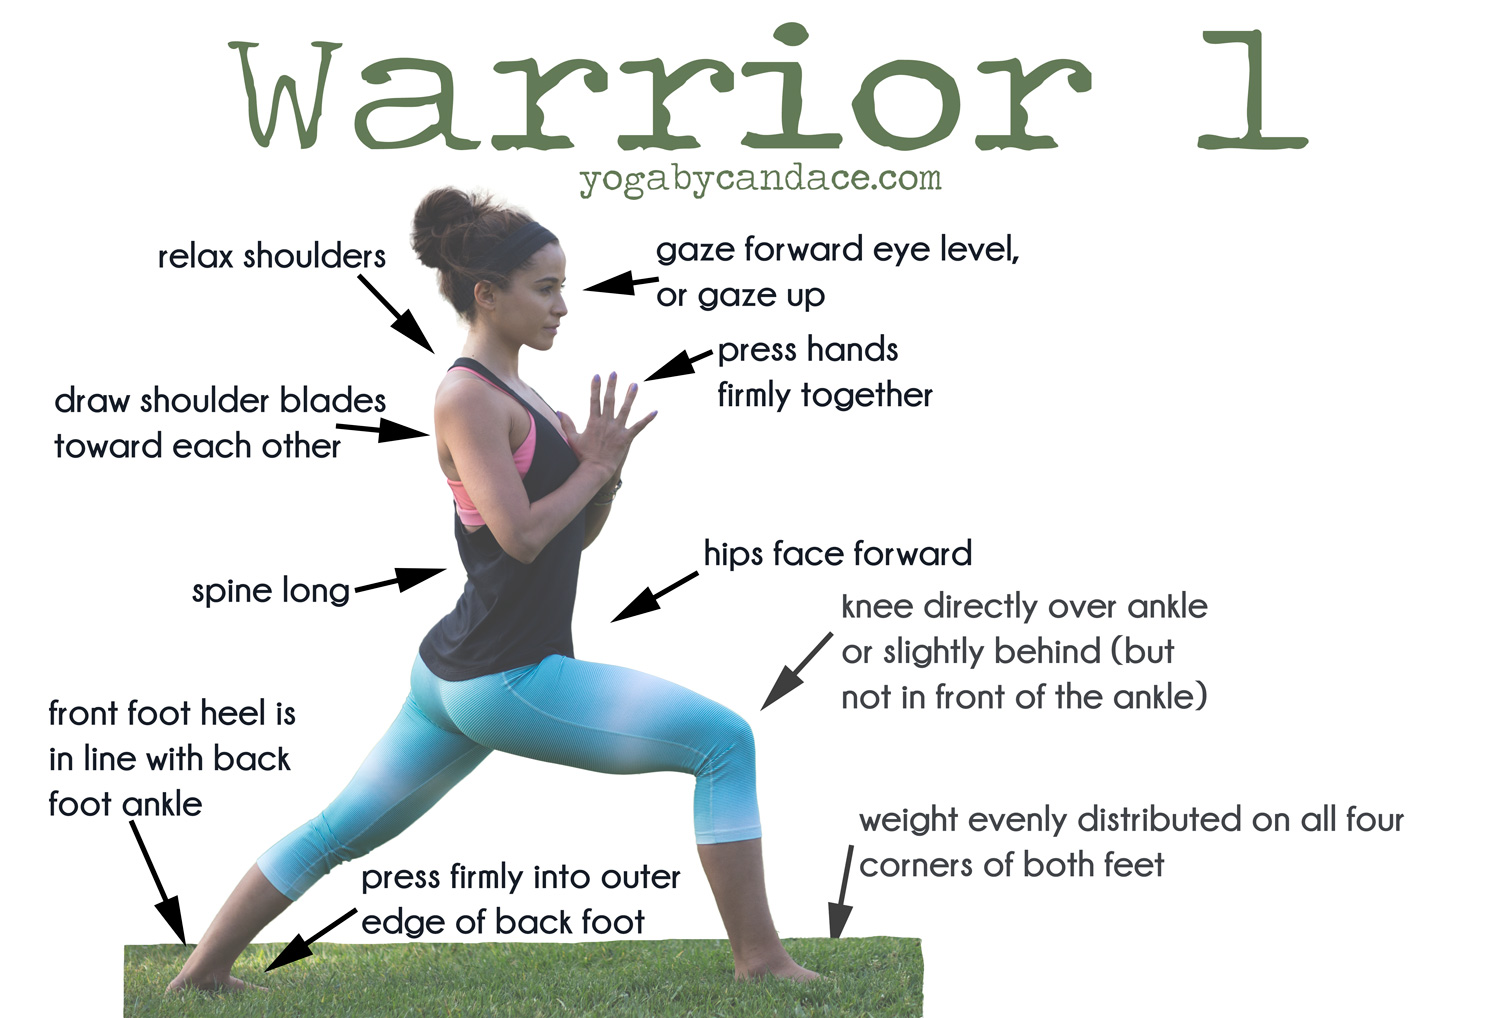
Credit: www.yogabycandace.com
Warrior 1 Vs. Warrior 2: Key Differences
People often mix up Warrior 1 and Warrior 2. Here’s a quick comparison to clear things up:
| Feature | Warrior 1 | Warrior 2 |
|---|---|---|
| Hips | Face forward | Face the side |
| Arms | Reach overhead | Reach out to the sides |
| Back Foot | Turned in (45°) | Turned out (90°) |
| Torso | Twists forward | Stays open to side |
Muscles Worked In Warrior 1
Warrior 1 is a full-body pose. These are the main muscles you use:
- Quadriceps: Front of your thighs, working hard to keep the knee bent.
- Gluteus Maximus: Buttocks, stabilizing your hips.
- Hamstrings: Back of your thigh, especially in the back leg.
- Calves: Especially the back leg, as you press the heel down.
- Hip Flexors: Front of your hips, stretching and opening.
- Core: Abs and obliques, keeping your torso steady.
- Shoulders and arms: As you reach up, you strengthen your upper body.
Modifications And Variations
Not everyone’s body moves the same way. Here are some ways to adjust Warrior 1:
- Shorten your stance: If your hips can’t face forward, bring your feet closer together.
- Hands on hips: If your shoulders get tired, keep your hands on your hips instead of reaching up.
- Chair support: Hold a chair in front of you for balance if needed.
- Use a wall: Press your back heel into a wall for extra stability.
- Cactus arms: Bend your elbows and open your chest if your shoulders are tight.
- High lunge: If your back heel won’t stay down, lift it and practice a high lunge shape.
Safety Tips And Who Should Avoid Warrior 1
While Warrior 1 is safe for most people, there are some cases to be careful:
- Knee injuries: Keep your front knee directly above the ankle. Don’t push past your limits.
- Hip problems: Adjust your stance width so you feel stable, not strained.
- Shoulder pain: Lower your arms or keep hands on hips.
- Pregnancy: This pose can be helpful, but widen your stance and don’t over-twist.
- Balance issues: Practice near a wall or use a chair for support.
If you feel sharp pain, come out of the pose and ask a yoga teacher for advice.
Advanced Tips For A Stronger Warrior 1
If you want to go deeper, try these ideas:
- Press down through the outer edge of your back foot. This activates your inner thigh.
- Pull your front knee slightly outward to engage your hip muscles.
- Soften your lower ribs in to avoid puffing your chest forward.
- Move your tailbone down and under to lengthen your lower back.
- Lift your chest without arching your spine. Imagine a string pulling your sternum up.
- Firm your back leg. Imagine you’re pressing your foot into thick mud.
A non-obvious insight: Most people focus only on the front leg. But the secret to a powerful Warrior 1 is actually in the strength and rotation of the back leg and hip.
Breathing In Warrior 1
Your breath makes the pose complete. Try this:
- Inhale as you reach your arms up and lengthen your spine.
- Exhale as you sink deeper into your front knee.
- Keep your breath slow and smooth. If you can’t breathe easily, ease out of the pose a little.
Holding your breath makes the pose harder and less effective. Let your breath guide your movement.
Credit: srisrischoolofyoga.org
How Long Should You Hold Warrior 1?
- Beginners: 3–5 breaths per side is enough to start.
- Intermediate/Advanced: Work up to 10–20 breaths or 30–60 seconds per side.
- Vinyasa classes: You may hold for just 1–2 breaths as you flow through other poses.
The goal is to build endurance and control, not to push until you’re shaking.
Warrior 1 In Yoga Sequences
Warrior 1 is a key part of many yoga flows. Here’s a common sequence:
- From Downward Dog, step the right foot forward.
- Spin your back heel down.
- Inhale, rise up into Warrior 1.
- Exhale, return hands to the mat and step back.
You’ll also see Warrior 1 in Sun Salutation B (Surya Namaskar B) and many other standing sequences.
Mental And Emotional Benefits
Warrior 1 isn’t just physical. It can also affect your mood and mind:
- Builds confidence: Standing tall with arms high makes you feel empowered.
- Increases focus: Keeping your balance and alignment requires full attention.
- Relieves stress: Deep breathing in this pose helps calm your nervous system.
- Encourages presence: You can’t think about anything else when you’re holding Warrior 1 well.
Comparing Warrior 1, Warrior 2, And Warrior 3
There are three main “Warrior” poses in yoga. Here’s how they compare:
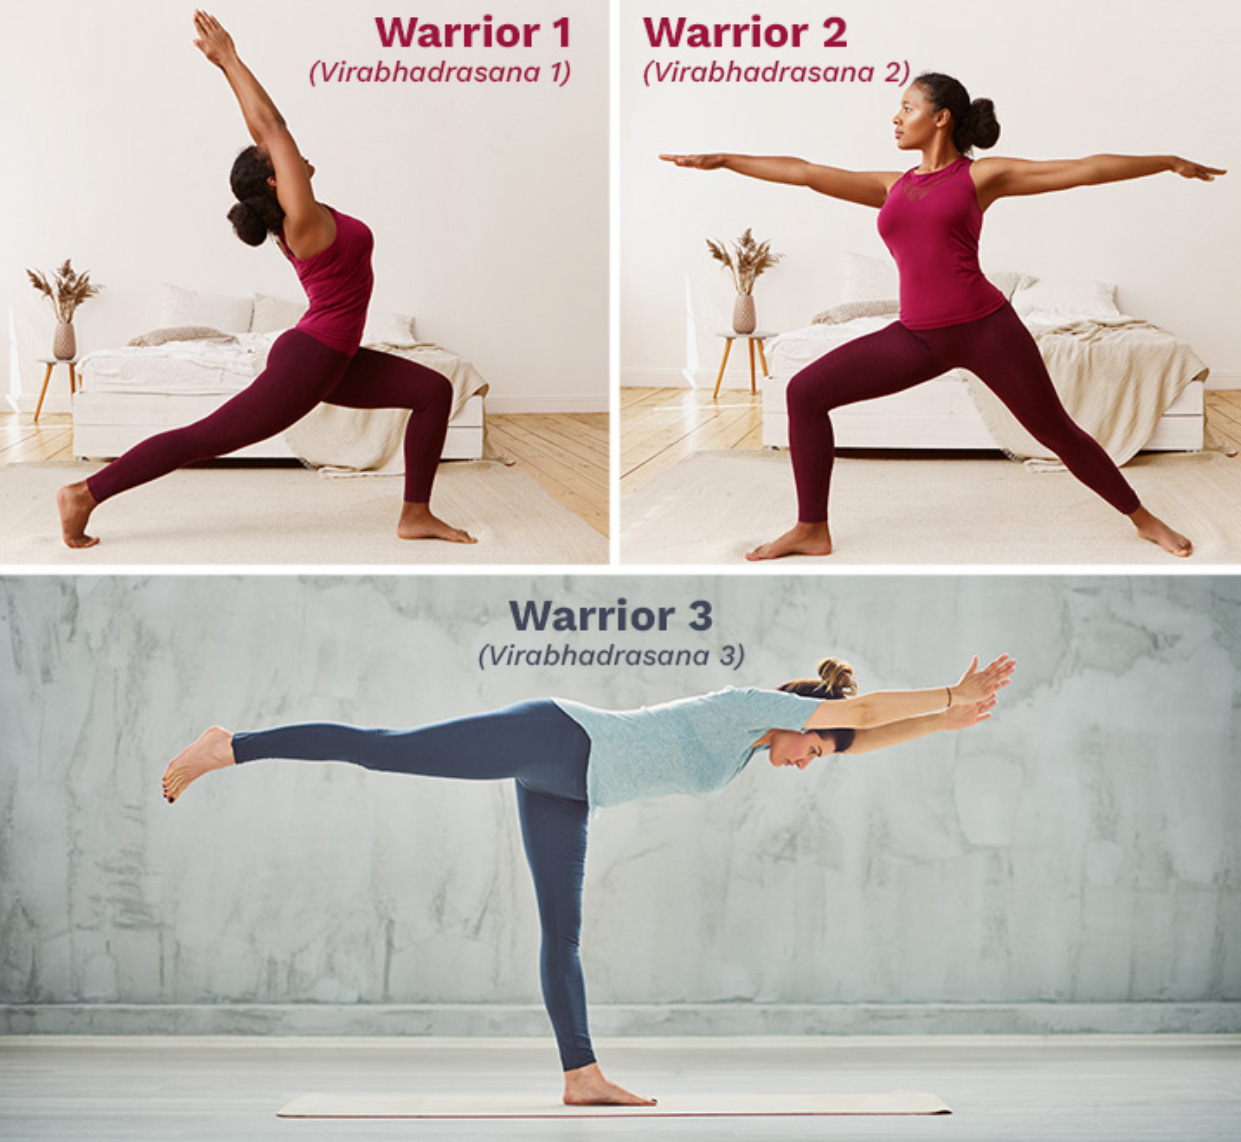
| Pose | Body Position | Main Benefit |
|---|---|---|
| Warrior 1 | Lunge with arms overhead, hips forward | Strength, stretch, focus |
| Warrior 2 | Lunge with arms out to sides, hips open | Hip opening, stamina |
| Warrior 3 | Balance on one leg, body parallel to floor | Balance, core strength |
Understanding these differences helps you get more from your practice and choose the right pose for your needs.
A Brief History Of Warrior 1
The Warrior poses are named after Virabhadra, a legendary warrior from Hindu mythology. According to the story, the god Shiva created Virabhadra as a fierce fighter. The three main Warrior poses represent different moments in his battle. Warrior 1 shows the moment Virabhadra arrives, sword raised, ready for action.
But in modern yoga, Warrior 1 is about more than battle. It’s about facing challenges with strength, courage, and grace—on the mat and in life.
How To Progress In Warrior 1
If you want to improve your Warrior 1, try these tips:
- Practice regularly: Even a few minutes a day builds strength and flexibility.
- Use a mirror: Check your alignment to avoid common mistakes.
- Ask for feedback: A good yoga teacher can spot things you might miss.
- Work on hip flexibility: Poses like Low Lunge, Pigeon, or Half Split help open your hips.
- Add props: Blocks under your hands or a strap between your hands can help you stay balanced.
One thing many miss: It takes time for your hips to open and your balance to improve. Patience is key.

Credit: liforme.com
The Role Of Warrior 1 In Different Yoga Styles
Warrior 1 appears in nearly every style of yoga, but each one approaches it a little differently:
- Hatha Yoga: Focuses on alignment and holding the pose.
- Vinyasa/Flow: Moves in and out of Warrior 1 as part of a sequence.
- Iyengar Yoga: May use props and spends time adjusting details.
- Power Yoga: Holds Warrior 1 longer for strength and stamina.
- Ashtanga Yoga: Warrior 1 is part of the set sequence, especially in the standing series.
Each style can teach you something new about this pose.
Resources For Learning More
If you want to dive deeper, there are many books, online videos, and classes. For a clear and trustworthy explanation, check out this Wikipedia page about Virabhadrasana.
Frequently Asked Questions
What If My Hips Won’t Face Forward In Warrior 1?
This is common. Try shortening your stance or turning your back foot forward a bit more. It’s okay if your hips don’t face perfectly forward—just work toward it over time.
Can I Do Warrior 1 With A Knee Injury?
Yes, but keep your front knee directly over your ankle and don’t push too deep. If you feel pain, back off or try a higher lunge instead.
How Often Should I Practice Warrior 1?
Aim for 2–3 times a week at first. As you get more comfortable, you can include it in your daily practice.
Is Warrior 1 Safe During Pregnancy?
Usually yes, with modifications. Widen your stance for balance, don’t over-twist, and listen to your body. Ask your doctor if you’re unsure.
Why Does My Back Heel Lift Up?
Your calf and ankle may be tight. Bring your feet closer together, turn your back foot forward, or practice with your heel lifted until you gain more flexibility.
Warrior 1 is more than just a shape—it’s a practice of strength, balance, and focus. Whether you’re a beginner or an experienced yogi, every time you step into this pose, you build not just your body, but your courage and presence, one breath at a time.